

Create “Hotspot” presentations to engage learners with tools you already know
In a world of digital learning, finding new ways to engage learners without having to entirely learn new tools, websites, or software is incredibly valuable. Learn how to use a standard slideshow tool, such as Keynote or Google Slides, to build engaging hotspot presentations similar to other popular online presentation tools.
This is easy to do and only requires learning one key skill — linking to other slides within the presentation.
In the upcoming weeks, our now novel version of virtual school is going to lose some luster with students. Whatever you are doing today to engage students online will soon become a pattern, and predictable patterns are the kryptonite of engaged learners.
For this reason let’s focus on some new ideas for using tools you may already know and use in order to teach in new ways. In today’s spotlight, I wanted to showcase a way to build presentations (slide decks) that do not follow a linear, start to finish path. We are talking about the use of tools like Google Slides, Keynote, or PowerPoint. This means the audience can click around in the presentation, making choices and clicking on appropriate icons to self-direct their own experience through the topic.
View an overview of how to create a hotspot presentation using Keynote (similar to a Thinglink presentation). This includes directions for grading in Google Classroom.
A “hotspot” presentation is one where a single base graphic will have multiple “clickable” points on it. Each clickable point is a way to present new, relevant information. For clarity, let’s use an example in the periodic table of elements. The base graphic, the periodic table of elements, is at the core of the lesson. As a teacher, you will want to point out many key pieces of information specific to the periodic table. By placing clickable icons over the top of the base image (or in this case clickable “targets” over the top of a picture of the periodic table), you can deliver relevant information, such as the atomic weight, atomic number, and the group to which the element belongs.
When teaching in a face-to-face model, teachers can easily walk students through the deeper elements of a topic in an organized way, but in a linear slideshow presentation (one that starts with the first slide in the slide deck and ends with the last slide), making these connections becomes more challenging for students. This is where hotspot presentations truly shine. With a hotspot presentation, students begin to make natural connections to deeper topics simply through the “links” that are made naturally based upon the way that the presentation is designed.
Designing a Hotspot Presentation
Choose a great focal image
Start with a great base image. This is really the “home screen” of your presentation. Select a topic or point of focus that will continually come back to this base image.
Teaching a lesson on Gettysburg?
Choosing an interesting, detailed, and appropriate image is essential (not too graphic)
Maybe the focal image of somebody like 69-year-old civilian fighter John Burns would be appropriate. There is just enough detail to draw in students, but the details are not entirely obvious at first sight. Some of the key hotspots I might include on this photo are: 1) Burns’ civilian clothing, 2) rifle style, 3) lack of wear on Burns’ boots, and 4) his aged features. This image is authentic and offers just enough detail to highlight some key areas of the topic.
Maybe you are teaching on lesson on the bawdiness of Shakespeare’s plays and why Shakespeare elected to include this in his writing. A good look at some of the features of The Globe will help students to understand that plays were written for the masses of common people. Focusing in on 1) the distance between actors and attendees, 2) the tiers of seating for those who could afford private seating, and 3) the lack of seating in the rows closest to the stage (standing room only), would be great hotspots for this particular image.
The key for any hotspot presentation is selecting a great key image. This is the image the entire lesson is built upon.
Storyboard your slides on paper
I always tell people to draw out complex ideas on paper first. It is so much faster to plan on paper before building a complex, technology-rich tool that just does not work out later due to poor planning.
When designing for a hotspot presentation you need to draw out three key elements.
Focal image with key hotspots indicated
What does your focal image slide look like? You’ll need to roughly mark out the hotspots (artistic skills not needed — text is fine) that you want to identify. It might look something like this picture.
The next planning step is to simply draw out the “map” of the slide show. Keep in mind that this is not a linear presentation. Viewers can click on any hotspot at any time. For that reason, we need to map out the viewer’s experience to make building the presentation easier. Here is an example that I drew just to show a rough outline.
Notice that this presentation is only five slides in total. And three of those slides are nearly identical in their design. This means I can save time by really only having to design three slides, and then copying one of those slides twice to look identical.
Finally, you just need a think through and possibly sketch your buttons. These are the links that will be clicked by viewers. You can get an idea of that from the photo I sketched above. In planning I did not realize I needed a final slide, but as I sketched it out I realized that I wanted a way for the viewer to see a slide on Shakespeare before the presentation ended, so I added the “End” button to my design.
Building a Hotspot Presentation
For the purpose of simplicity, I will assume you already know how to generally build a slide deck presentation. The key to successfully developing a hotspot presentation, then, is just one little piece of information: linking. And whether you use Keynote, Google Slides, or PowerPoint, linking is possible in all of these tools.
Building the Focal Image Slide
The Focal Image slide is made up of: 1) a primary image, and 2) several icons layered on top of that image. Start by adding your primary image to the slide first. This will set the stage for the slide, placing it at the back of images. This will be helpful later.
Next, choose your hotspot icons. This can just be a shape, clip art, or text. I recommend making these icons roughly the same size (copy and paste works well) for a more uniform look in the end. You can also add title text and other text boxes to help viewers navigate the presentation. Once you have this page set up entirely, click on each icon one more time and make sure your layering brings the icons to the front. Again, this just makes it easier to work with later.
Building the first choice slide
Sometimes hotspot presentations can become very long and be quite challenging to build. This tip will save you time. Build and link one of your choice slides (the slides that contain the information about each hot spot) first, and then duplicate that slide. This will make your presentation look more uniform, and it will save you many clicks (and possible linking errors) later.
Your template choice slide needs 3 key items: 1) a space/box for you to type relevant information about the hotspot the viewer selected (as well as a place for additional images), 2) a “home” icon that will take the user back to the focal image slide, and 3) a “end” icon that will take the user to a final slide that will end the presentation.
Linking tutorial for Google Slides presentations, Keynote for Mac, and Keynote for iOS. Learn to link and hotspot presentations are a breeze.
The text/image space is fairly self explanatory. This is where the instructional material will go about one of your hotspots. At this time, just type one identifiable word about the hotspot topic. You can add details later.
Your home icon is just a shape or image that users will click to get back to the focal image slide. Once you have added the shape or image, I recommend adding a little text box on or near it that indicates this link takes the viewer back to the start. “Home” works, but you can use whatever vernacular makes sense. Finally, it’s time to link this image.
Finally, your “end” presentation icon. You will need to build one slide that is your final slide in the slideshow. Think of it as the exit door for your presentation. Without this exit option, your viewers will be stuck in an infinite loop and will never be able to end the presentation.
First, add a slide to your presentation that is the “final” or “end” slide. This will be the final information your audience will see before leaving. Then, back on your first choice slide, create an icon, give it an “end show” label/text box, and link it to the final slide in your presentation. You’ll use the same linking strategy you just learned, but you will point it to the final slide this time.
Duplicate and customize your choice slides
Congratulations. You have done the hard work by building your buttons and links for your choice slides. Now you will duplicate your first choice slide for each choice that you want to viewers to have on the focal image slide. For now, just make these slides and edit them quickly by giving them text that represents the choice. This can get confusing, so document your slides as you go with labels. You can come back to edit and perfect these slides later, but right now we are on the business end of building this slide deck.
Once you are done, it’s on to the final technical step - linking your focal image hotspots.
Linking focal image hotspots to choice slides
That last step in this process (other than adding customized content to your choice slides) is linking the icons on your first slide (your focal image slide) to the appropriate choice slide you just finished creating. And the good news is you already know how to do this. One skill, learning to link to others slides within a presentation, opens up all kinds of possibilities for ways to make your presentations more interactive. So go ahead — click on each icon on your focal image slide and link that icon to the correct slide.
Obviously you have work to do tin adding content to the choice and exit slides, but the skill of linking them together in a unique way is done. For the sake of your audience, please take a moment to check your links. This process can be fraught with errors, and a little bit of link checking now (hit play on the presentation and click on the links) will save your audience of fits and frustrations later.
One last tiP: avoiding auto-advance in slide shows
A hotspot presentation slide show is a non-linear presentations. You are working to create the illusion for the viewer that they are in custom-designed software. Nothing can ruin that illusion quite as quickly as them inadvertently advancing to the next slide, a slide they were not supposed to see because it is out of context.
For my Keynote (and PowerPoint) using friends, I’ve got great news. You can be assured that with the switch of a setting your users will not advance without clicking on a link.
Keynote for Mac
With the Keynote presentation open on your Mac, click on the Documents button in the upper right. Under “Presentation Type” select “Links Only”. That will take care of it. The audience will not be able to advance without clicking on a link.
Keynote for iOS
With the Keynote presentation open on your iPad, click “…” icon in the upper right. Click “Settings” and under “Presentation Type” select “Links Only” to stop any auto-advancing in the presentation. This will halt viewers from moving forward without clicking a link in the presentation.
Google Slides
My apologies to my friends using Google Slides, but this is one feature that is sorely missing from Slides. The best option that I can offer you is a work around at best. On EACH slide you will create one more box. You will need to link that box to the slide that it is on. So if you are on slide 2, create the box, and then link that box to go to Slide 2. Finally, select the box, drag it out to the full size of the slide (so it covers everything on the slide), and then select “Arrange” —> “Order" —> “Send to Back”. This will place your box, with the link to the same slide it is presently on, in the background. If a user accidentally clicks this box, they will be tricked into thinking nothing happened, and will be presented with the same slide to pick a different option.
I know! So annoying! But it works and it is something that will let you achieve a similar effect in Slides if that’s the tool you have access to.
New use of tools you already know
So the next time you are looking for a fun way to present ideas to your audience in a different way, consider using a tool you already know in a slightly different way. The impact on and engagement of your audience will reap rewards making the time invested well worth it!
And if you use tools you already know and have access to in your instruction, you can parlay that personal learning into activities you can also have students do to deepen their learning, build upon their skills for productively using technology, and challenge their thinking.

Improve sound quality in your online videos with these microphones
Suddenly creating more online content than you ever imagined you would? Educators can add value to their online video content by improving the quality of sound recordings with these suggested tools.
As teachers across my network are suddenly being thrust into the practice of creating online instructional videos, one of the common concerns I have heard throughout the week was how much people hated the sound of their own recorded voice.
If you can relate, let me first say that you are not alone. Few people actually enjoy listening to the sound of their own recorded voice. However, that does not mean your audience has the same reaction. If your audience already knows what you sound like, they recognize your voice and are not bothered by it. In fact, for your students at home who are just missing you and school, they may find it quite comforting to hear their teachers.
And if they do not know you and are watching your video, well, then you are Internet famous! So, who cares?
One question I have been asked a few times this week was how to improve the audio quality when recording a video. I have been on the pursuit of better sounding audio for years. I have tried different microphones, sound boards, software applications. I have spent stupid money on recording products that sit on my tech shelf downstairs.
With that hard-earned experience, I am happy to tell you that with a slight investment (and not a lot of technical know-how), you can get better quality audio in your video recordings.
Buy a Better Microphone
Simple as this may sound, the solution to better audio is to purchase a better microphone than the one built into your device(s). This is not to say that the microphone in your devices is bad. Some are really good, actually. But they are designed for a wide variety of situations. They need to be easy-to-use, reliable, and somewhat cheap to manufacture. They are meant to capture audio in the room, audio to the side of them, and audio directly into them. They are a multi-purpose microphone intended to be a jack-of-all-trades, but master of none.
Buying a better microphone means buying the microphone that is intended for your key audio purpose. For this post, my assumption is that you are an educator individually speaking into a microphone. (If you have a different purpose, these recommendations may not be most appropriate for you.)
Desktop Microphone Recommendations
If you are looking for a microphone to place on a solid surface while you record, I have a microphone that I absolutely love and would strongly recommend. The Shure MV5 is a microphone that I use several times a week, whenever I am recording instructional and support videos. I plug it into my Mac laptop, change my input in whatever program I’m recording in, and I press record. The quality difference when using the Shure MV5 will be obvious immediately. Trust me, my videos sound so much better when I record using this microphone. For me, the slightly more expensive price point is worth it.

A feature I love about the Shure MV5 is the stand that comes with it out of the box. Positioning a desktop microphone for comfort can be challenging, especially a microphone that you need to speak into directly. The stand on this microphone is small, but its unique positioning system makes the mic incredibly flexible (without having a permanent mic trapeze setup on your desk). Additionally, the stand makes the mic incredibly portable, which is particularly useful if you are not lucky enough to have just one place you work in your home.
Listening back to your recordings is critical to creating better instructional videos. The Shure MV5 has a built in headphone plug, making listening to playback even easier. With this setup, pick a single audio input/output source, your Shure MV5 mic. I like simplicity, especially when I am working with people new to technology. Nothing makes it easier than picking a single setting on your device.
I truly love this mic, and I guarantee you will hear better quality audio in your recordings as soon as you use it. The price point is higher than many beginners may be comfortable with for a mic. I totally understand that, but if you are seeking truly high quality audio, I find this mic to be a bargain compared to other high quality microphones on the market.

If the price point of the Shure MV5 is a little out of your comfort range, I do have another good recommendation that cuts the price in half. This is a microphone we purchased for use at school, and it is our favorite mic to offer when a teacher needs to check out a desktop microphone. The Samson Meteor Mic USB Studio Microphone is easy to use, well designed, and will definitely give you a boost in your audio recording quality.
This handy little desktop microphone has a truly unique design. I hate a lot of desktop clutter, and I love mobility. Some of the microphones that I have tried have complex adjustable arms, pop-screen filters, and wires coming out of them. While those types of setups may make your desk feel like a mini professional recording studio, they are far from being neat, tidy, or portable.
The Samson Meteor Mic, though, has legs that fold up to protect the microphone, and flip out to serve as its stand. This makes the stand incredibly adjustable to allow for a comfortable recording angle while you talk directly into the microphone. It is a handy mic that is well designed.
The audio quality from the Samson Meteor Mic is notably better than the microphone built into your device. The setup on my Mac is incredibly easy. And this mic also has a headphone jack on the back for easy audio setup and playback. Overall, the Samson Meteor Mic is a quality microphone that will offer a noticeable improvement in your audio for a smaller price.
Lapel Microphone for On-screen Appearances
As much as you might not want to, sometimes you just need to show your face on camera (or you want to interview somebody else on camera). When that happens, you still want better audio to improve the overall quality of your video. In these cases, a desktop microphone may not fit the need. After a long search and several iterations of solutions to this issue, it has come down to this solution for me: a lavalier or lapel microphone.

You have noticed these mics before for on-stage speakers, on-air television hosts, and others. I avoided them for a time because they seemed like an expensive solution. However, about three years ago I finally decided to make the purchase and was pleasantly surprised to learn that the wired, lower quality version of these mics are actually very reasonably priced. They are also easy to set up. And for a tool that I do not use regularly, those are two key factors to make the purchase worthwhile.
I am going to share a microphone of better quality than the one I purchased, but in the same price range. The PoP Voice Professional Lavalier Lapel Mic is a good choice. There are so many options on the market in this category, so there are a few things to consider when buying one.
The wire on this microphone is a little thicker than some of the other cheaper options. Especially for a microphone that spends a lot of time coiled up and out of the way, a slightly better cable that does not break quite as easily is something to consider. Additionally, you want to pay attention to cable length on a wired lapel microphone. This cable is roughly 6.5 feet. That should be long enough to get your iPad or phone far enough away to set up a decent shot of your subject while also capturing better audio.
The plug on these types of microphones is also important to note. Even though my iPhone no longer accepts a standard headphone jack plug, I still buy accessories with headphone jacks on them. I like the versatility of being able to use it on a tablet, on phones, and also on computers. If you are planning on using the PoP Voice Professional Lavalier Lapel Mic on your phone, you may want to consider purchasing an adapter to allow it to connect. Again, there are many on the market, but I tend to stick with the official Apple adapters as they are always supported.
Finally, buy one with a small wind screen or pop filter on it. This does reduce some of the “p” sound popping on camera, but more importantly, it provides a little wind and moisture barrier for your microphone. Nothing can ruin the audio on an outside interview like a nice breeze.
So, there you have some of my strongest product recommendations to improve the audio in your online videos. Remember, even the best video paired with poor audio quality will leave the viewers underwhelmed. Consider these upgrades to give your online recordings the boost they desire! And if you have an educator in your life, consider giving these microphones as gifts for teachers who would otherwise not buy these kinds of tools for themselves.
Teaching Students to Become Image Detectives
When we teach students to read, we teach them techniques for finding context clues within a text. We show them how to annotate text, marking it up so they (and we, as their text guides) can visually identify their thought process throughout the text.
In a visually rich world where students just as commonly encounter visual elements (photos, videos, gifs, emojis, memes, etc.), we should also get serious about teaching students how to "read" the clues and context available within visual media. While marking up text-based media has always been far more common in literacy instruction, we now have tools readily available to annotate or "mark up" images in the same ways to help us uncover their thinking as they observe images.
There are tools available on any device to do this with ease with your students. If you are in an iPad classroom, you can use the Markup tool in the Photos app. If you are using Chromebooks, you can just as easily use Google Drawings to do the same kind of activity in class.
Setting Up a Successful Image Detective Lesson
Teaching students to look closely as images is not a new idea. Teachers have long used images to capture a student's interest an attention, to create context, or to encourage students to ask questions about a topic/subject. However, to help students develop the skills of being image detectives, we need to carefully select the right images and utilize the right tools to let students "uncover" the key clues.
The process starts with three key components: a topic, a driving question, and interesting imagery.
Topic and Question
Every content area lends itself to some level of imagery exploration, so this will work in any classroom. The real challenge is asking questions that students will find compelling, and that can truly be answered by the images that you uncover. To begin, develop a generic question you will have students answer, which will give you a starting point to begin your image search. This is the "rough draft" of your question for students to answer. You will need to be flexible with the question, adapting it to fit perfectly once you find the right image.
Selecting an Image
Images are everywhere on the Internet. However, not just any image will do for this kind of investigation. When selecting an appropriate image for this type of lesson, the goal is to find images that have historical, geographical, or contextual clues hidden within them. There has to be evidence within the image to tell a story, which can in turn provide points for students to consider and discuss.
Let's look at an example of two images. The generic question I want students to ponder is this:
"What is it like for an immigrant to start a new life in a new country?"

The top image is from a wonderful site that teaches students how to become Image Detectives. The lower image is from a Google search which turned up an image from a 2006 immigration march in Washington D.C.
Both are images intimately tied to immigration. The lower image is far more timely, relevant to our students lives, and attractive to view (color, interesting subject, focused). But the upper image -- there is so much more richness of detail. While we could definitely foster a conversation with the lower image, the upper image lends itself to student exploration. And that is exactly what we are looking for when we select an image for students to explore and uncover.
Once you have selected the right image, you can then tailor your question to the image to promote even richer thinking and conversation.
"This family that has recently immigrated to America.
What issues may they be confronting as a result of this life change?"
Using Technology to Annotate Images
For those in an iOS/iPad environment, marking up images on the iPad has become very simple. You no longer need an additional application. The Markup function on the iPad comes baked in iOS 10 and beyond.
Start by distributing the image to your students so that every student has a copy of the image on their device in the camera roll. This can be achieved in a number of ways. Whether using the AirDrop function (especially if you use Apple Classroom where you can AirDrop to all students with one click of a button), or just placing the image in Google Drive or on a class website, the goal is for the students to save the image to their iPad Photos.
Next, your students will be accessing the Markup tool in the Photos app (yep, the one that came with the iPad!).
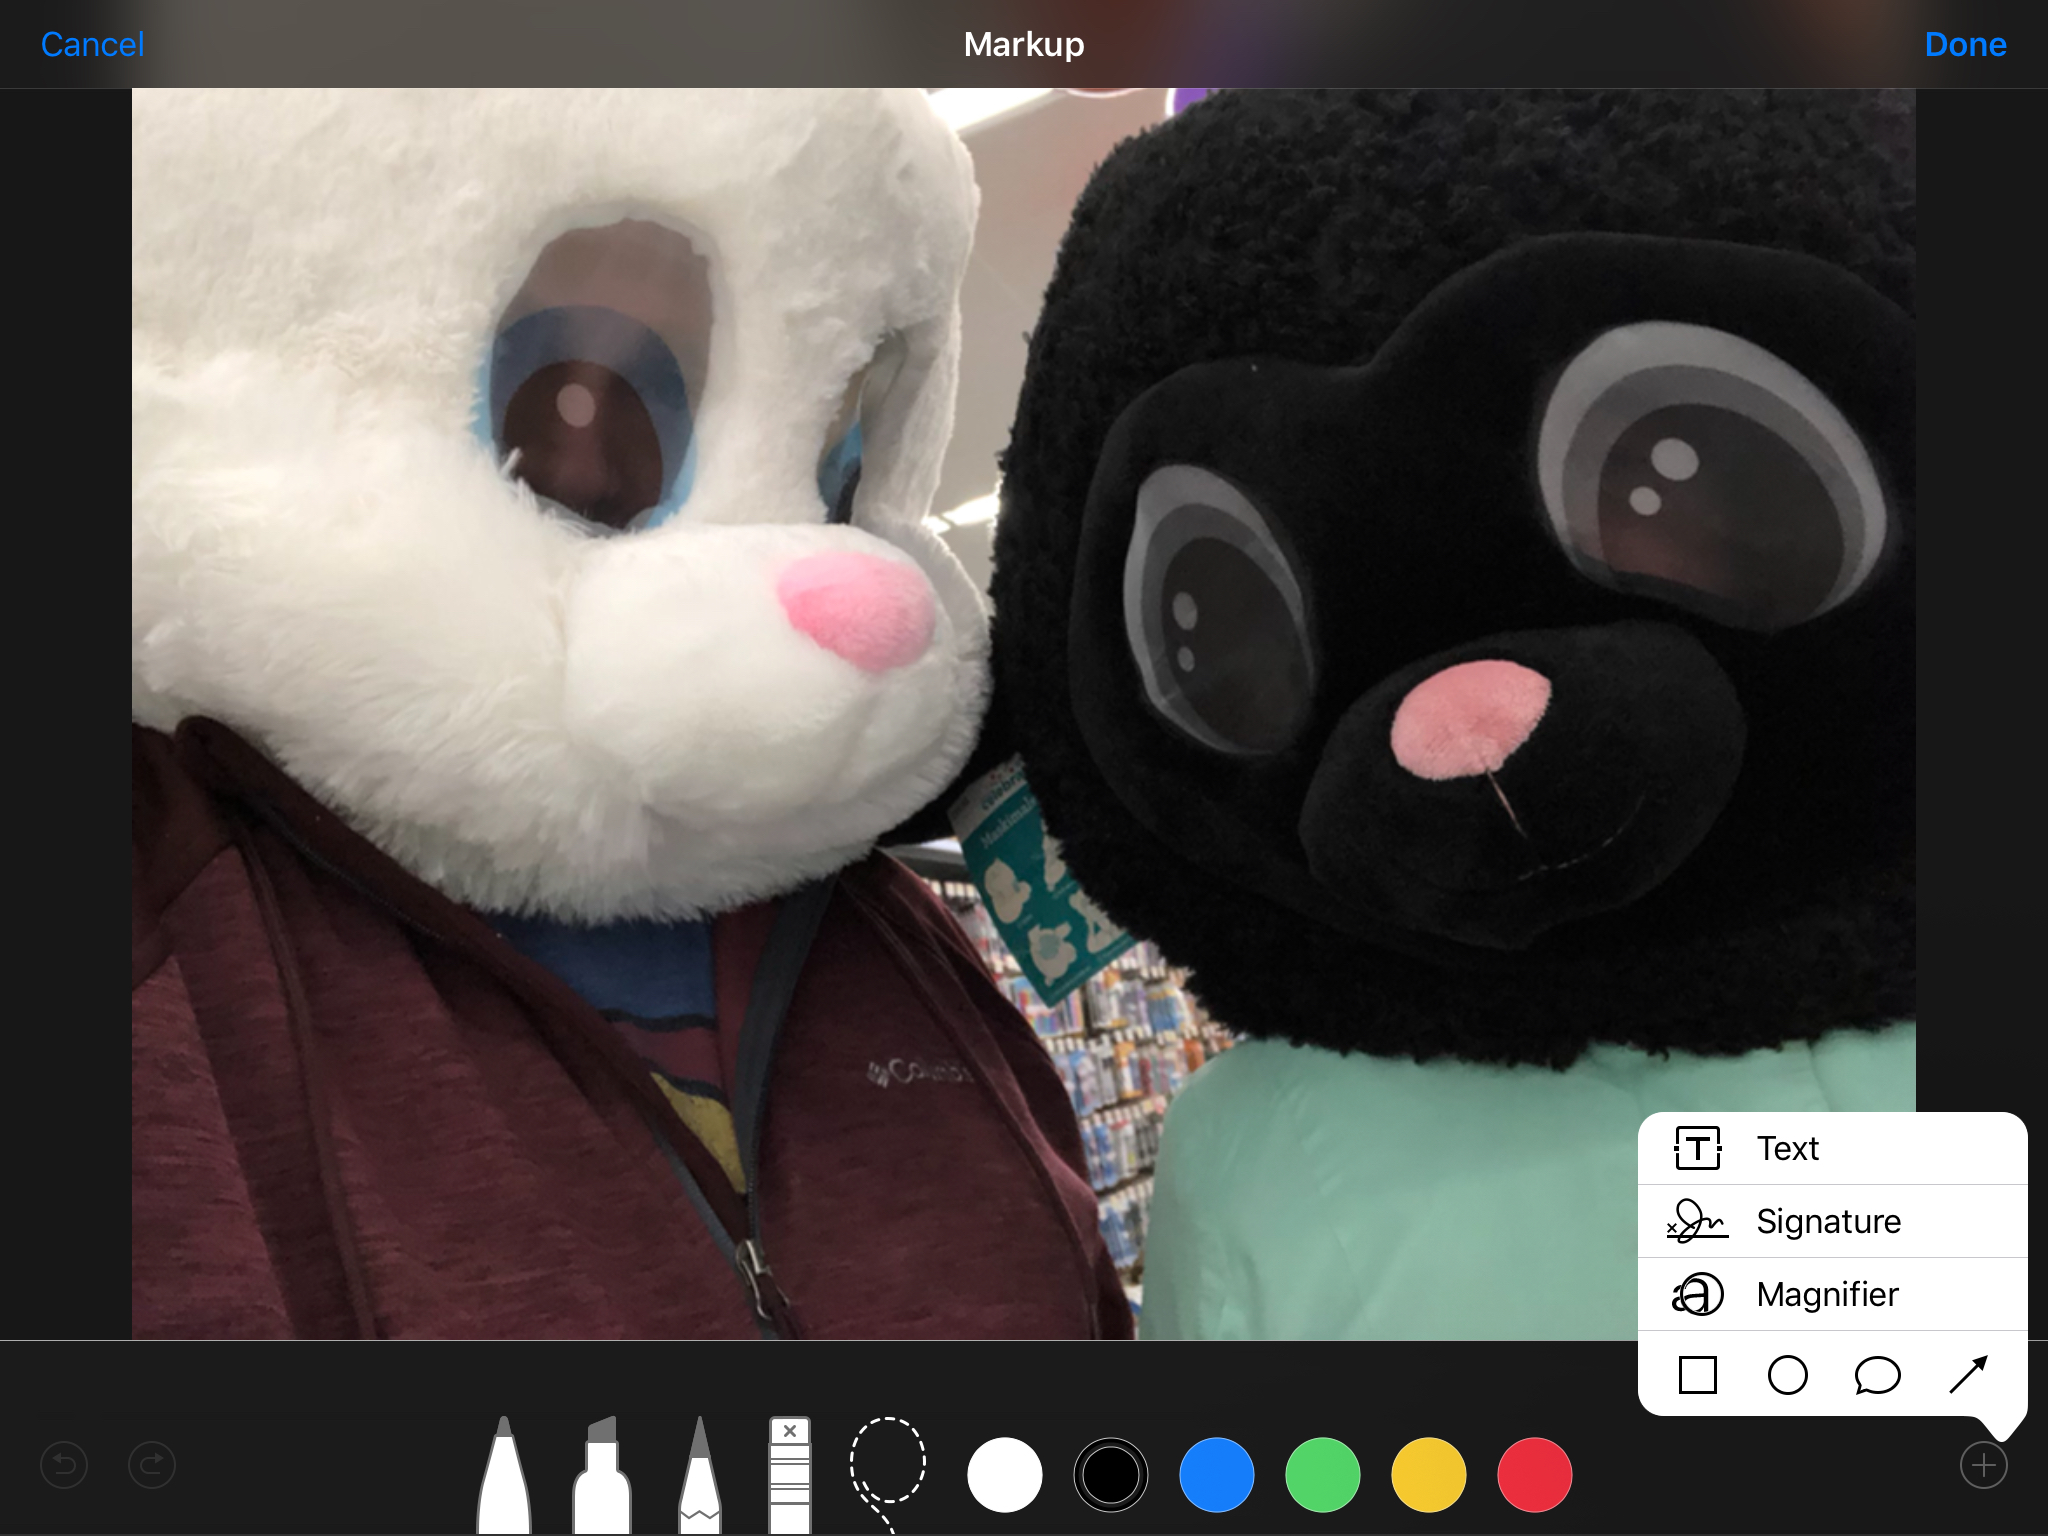
A full range of image editing tools will appear as a part of the "Markup" tool set.
- Open the Photos app, tap on the image you shared with your students, and "Select" the image.
- Then click "Edit" to reveal the editing tools, and select the ellipsis button (three dots).
- Select the "Markup" tool. The drawing tools will appear.
- When finished, select "Done" and the drawings/text/shapes placed on the image will be saved as a part of the image.
You will need to teach students how to use some of these editing tools to produce better results. For instance, instead of handwriting on the image with the pen, use the text tool to type to make the writing smaller and more legible. Use shapes and arrows to point out specific details in the image. Use the pinch gesture to zoom in and out of the picture to get close to the details while drawing on the image.
Here is an example of the work a student might produce.

Notice how typed text makes it easier to read. Also, using color can help point out different types of details the student has uncovered in the image they are annotating.
While Markup works in the iOS/iPad environment, there is a similar tool that works on Chromebooks and computers: Google Drawings. (Drawings does NOT work on the iPad at this time.)
This instructional video from Kelly Hollis (@hollis_k) will demonstrate a similar process for marking up images using Google Drawings.
Fostering a Conversation for Image Detectives
Depending on the images a teacher has selected, there can be great clarity and agreement on what story is being told in the image based upon the clues that are available, or there can be considerable disagreement and discussion. As with any deep thinking activity, it is important to find ways to have students share their ideas/perspective and listen to the findings/thoughts of others.
One way to do this in an iOS environment is to have students AirPlay their image to the classroom Apple TV if one is available. Here every student can quickly and efficiently share their ideas. Another way to do this is to have students select a partner and AirDrop their individual image to their partner for review and discussion.
If you are in a Google environment, you can easily share Google Drawings with another student to start the conversation.
Sometimes the details in an image can be rather limited. There may not be enough details to uncover for all students to have an opportunity to share. This does not mean, though, that any student should be allowed to opt out of sharing their thinking. To be sure all students get a chance to share, you can use Padlet to foster an online conversation. (I know that Padlet has become far more limited since introducing their pay model, but even if you only have three free Padlet boards, you can at least spark a conversation in your classroom. Remember -- for ed tech companies to exist at all, they need to be able to make a profit.) You could just as easily use a Google Doc or Google Slides presentation, though, shared with all students allowing them to upload their images to the presentation or document.
The key is reflection and debriefing. How can you get your students to talk about what they have uncovered? When students talk about their thinking, they learn! And that is the ultimate goal in any activity we do with students.
Feel free to share your ideas in the comments below about how you have encouraged your students to become image detectives. What tools have you used? What have you witnessed for results in student learning?
Making the Most of the Tools You Have
Tonight I'm going to be leading a webinar on the Intel Teach Live series called The Dangers of App Overload. If you would like to register to join and follow along live, here is the link: https://engage.intel.com/events/1269
Before I write any more, I want to say thank you to Naomi Harm (@naomiharm) and Vanessa Jones (@vkajones) for the opportunity to connect and share tonight. It is an honor! Thank you for the opportunity.
This blog post below is inspired by my reflection on and preparation for tonight's webinar.
Something I hear more often in my work than I would imagine, and something that forces me to reflect on the question of how well we are using the tools we have available to us for teaching and learning is this comment that I will sometimes get a version of from teachers:
"So, I used to use this tool that I could use for lots of different projects. Is there an app for that now, or something that is just like it? It was called Photo Story. It was great."
Now, for those of you reminiscing about Photo Story, here is the reality. Photo Story has not been updated since 2006. As late as 2013 I can still find posts of people successfully installing and running Photo Story, but after that I'm not sure that there is quite as much success (except for those of you still rocking the XP).
If you don't know Photo Story, it basically allowed users to create a Photo Slideshow complete with instrumental music, transitions, voice overs, and text. By today's standards that maybe doesn't sound that impressive. Remember, this software was available at a time when merging and mashing media was, well, complicated.
Anyhow, the bigger picture is this. When I engage teachers in the question of why they loved Photo Story so much, the response is generally pretty consistent.
1 - It was easy to use.
2 - It was easily adaptable.
3 - It was reliable.
Teachers could learn the software once and then apply it to almost any media project or presentation. Want to tell a digital story? Use Photo Story. Want to create an engaging version of a science lab report? Use Photo Story. Want to impress your parents and students with photos and music from the spring concert? Use Photo Story.
The landscape looks VERY different today for teachers. Back then there was definitely a lot of software available at the time when Photo Story became popular. The trouble was that the software was most often not free (at least the well designed, easy-to-use stuff was not often free) and it was a laborious process to have it even installed on computers. Today, there is an ever-flowing stream of high quality, innovative, well designed free software, and it is all a button tap away from being installed on your tablet for use in your classroom. Apps are easy to acquire, easy to use, and there are generally several to choose between.
This leaves us with a new challenge, and it relates closely to the topic of digital distraction. It is incredibly easy to find new tools, use new tools, and replace new tools with newer tools.
Buggy app? Switch to a new one. Not fond of the advertisements? Switch to a new one. Clunky layout? Switch to a new one. Friends (or students) using something else? Switch to a new one. We are switching our tool set so frequently that the reality is we never really get to be truly proficient and productive with the tools we use.
So, maybe our new tools are easy to use. That's generally a given as no app can make it very long in a design-conscious marketplace.
Are they adaptable, though? Well, if Photo Story could be considered adaptable, so could nearly ANY creative app today. Whether it is iMovie, Pages, Notability, Explain Everything, the Google Apps Suite, or anything else you can imagine, the adaptability of the tool is in the mind of the user (and in my case, the mind of the teacher framing the instructional goals). These tools have the power to be used for a wide variety of instructional reasons.
The last question, though, is if these apps are reliable. And that is an interesting question. Software and apps today are more reliable than ever. Developers get more feedback from users today (or at least can get the feedback and data if they choose to) more quickly than at almost any other time in history. So, the apps themselves are very reliable. The follow-up question, though, is if we, the end users, are committing to the tools reliably. If we are fickle consumers and users of these apps, especially the apps that we use in our classrooms with students, then we will NEVER get to a point where we can determine the reliability or the adaptability of these powerful tools.
As educators, we must focus on how to make the most of the tools we do have readily and reliably available to us. Teachers are the most creative people I know. They can make meaningful lessons out of almost any set of resources. We now just need to slow ourselves, commit to the tools we do have, and then make magic happen in our classrooms.
I hope that in 10 years some teacher says to me, "Hey, do you know of any apps that I can use with my kids that is just like Explain Everything. That app was great. My kids did so much with that!"
Then again, in 10 years I hope that no teacher is still saying to me, "Do you know if Photo Story is still available for download?" :)
Moving Beyond Substitution: Innovative Use of Book Creator Climbs SAMR Ladder
If somebody promises gains in student achievement as a result of the purchase of 1:1 computing devices or of introducing an app in your district/classroom, it's fair to say they may be feeding you a line. However, when a teacher shares an educationally relevant, SAMR climbing use of that same tool or app, pay attention. Student achievement is likely to follow!
Recently a teacher in my district, Emily Hernandez, shared one way she uses the Book Creator app for iOS that pointed to an educationally relevant, instructionally appropriate use of the app. If you are not familiar with Book Creator, it is a way to develop interactive, multimedia-incorporating ebooks/iBooks on the iPad. It is a simple, easy-to-use app that could very easily be overestimated due to its apparent simplicity.
Ms. Hernandez, though, saw the potential in the tool because she dared to think differently about how her students would utilize the app to demonstate knowledge in her foreign language classroom.
Foreign language students need to demonstrate a wide variety of language acquisition skills, measured primarily through their ability to write and speak the language. This is traditionally assessed via written works and through the use of conversation and oral presentation with classmates and instructors.
In Ms. Hernandez's application of the Book Creator app, she was able to utilize these two assessment techniques to demonstrate the students' knowledge to date. Through the use of written text in the eBooks students created, as well as through the ability to record audio and place audio files into the eBook (a feature built into Book Creator), Ms. Hernandez achieved Substitution by having students do something they had always done, only now using technology to do it.
She climbed the SAMR ladder another rung, though, through the meaningful incorporation of audio, images, and written text into a singular demonstration of learning. Using the medium of a "published" eBook as their palette, students were being asked to provide written text, were asked to record and supplement that written text with an audio version of that text, and were able to incorporate meaningful images that supported the key themes and messages of their eBook. Here the teacher was taking advantage of the benefits of the technology built into the Book Creator app, as well as the student's pre-conceived notion of a more professional level of communication in a published book, to gain efficiency and to add authenticity to the demonstration of learning. This is clear evidence that Ms. Hernandez had now achieved Augmentation on the SAMR ladder in her use of Book Creator.
As we move into Modification, it is important to understand that the key focus must be on how the teacher changes the lesson design or demonstration of learning to take advantage of the functionality and efficiency the technology provides. Ms. Hernandez decided to make student reflection a key component of this project, allowing students to continually reflect on their "performance" based upon teacher feedback to inform their future learning. In her lesson design, she allowed students to return to the eBook to make changes prior to final publication.
The stroke of genius that Ms. Hernandez conjured was in using AirDrop and/or Google Drive (both export functions are natively available in the Book Creator app), functions that allowed the student to share the "draft" of their eBook with the teacher, as well as the audio recording function of the Book Creator app, to provide that feedback. As students shared the draft of their eBook with the teacher, the teacher reviewed it on her iPad in the Book Creator app, added a page for audio feedback in which she spoke her feedback to students, shared it back with students using the same AirDrop/Google Drive method the student selected, and then allowed them to continue working. While that feedback could have just as easily been spoken to the students in class, the ability to use Google Drive and audio record provided four key advantages.
- The students could work on the rough draft of the eBook at any time and "turn in" that draft as soon as they were finished. Ms. Hernandez could do the same with the feedback. This creates an ability to provide just-in-time feedback to students as they meet natural finish points, not just on a once-size-fits-all, pre-determined collection date.
- The feedback was recorded, meaning that both the students and Ms. Hernandez had a record of the feedback provided. This becomes valuable to the students as they make suggested changes and alter their final product, and it becomes valuable to the teacher as a way of measuring growth from previous iterations of a similar work product.
- Through the drafting process, Ms. Hernandez reinforces the concept that language acquisition is about a process of learning and growing, not a unit of study that is explored and then completed or forgotten.
- Students create a lasting product that demonstrates their understanding at a given point in time. This can be posted to an electronic portfolio, shared at conferences, or later revisited and revised as the students grow in their language acquisition.
Ms. Hernandez's work should be applauded, as it is an incredible reminder that the simplest of tools, used in meaningful, thoughtful, and creative ways, can really transform the way that our students perceive and experience the journey of learning.
YouTube Offering Free Audio Tracks; Aids Users in Following Copyright
Many of us have wrestled with the questions surrounding what constitutes educational use of media as it relates to copyright. While it is important for each of us to come to an understanding of what is appropriate fair use and what isn't in the world of copyrighted material, it is just as important that we begin to have discussions about copyright with our students.
As students publish more of their work for a larger audience, the discussion about copyright becomes a non-negotiable point of instruction that every educator must address. However, our own misinformation about copyright makes that conversation a difficult one to lead and to provide definitive advice to students on.
One resource I particularly appreciat for its simplicity and definitive answers, along with their offerings of pre-formatted lessons on teaching copyright to students, is the Teaching Copyright website (http://www.teachingcopyright.org/). The site isn't filled with so many lessons that you can't manage it all. In fact, the lessons and resources are incredibly direct and to the point -- something that those of us who don't love talking about copyright but know it is critical will appreciate. I'd encourage you to take a look, if only to further inform yourself as an educator prior to engaging in a multimedia project with students.
However, another key to the copyright conversation is helping students to find resources that are marked for full use because they are royalty free or have been given a Creative Commons copyright distinction. There are increasing libraries of these kinds of resources out there, but one notable service is now offering 150+ audio tracks that are free to download and use in media projects because they are truly royalty free!
YouTube recently announced it's expansion of a library of royalty free downloadable audio tracks. The tracks can be searched by genre, mood, instrucment, and track length. It's a great starting point for students to consider as they are looking for just the right feeling in their media project audio. It also allows educators to enter into the conversation about how audio tracks contribute to or detract from the meaning and personality of a piece! What a valuable lesson to engage in. Best of all, you can be certain that as your students share their project with the world, at least the audio portion of the project is safe to publish!
If you are interested in checking out the YouTube library, it's available here: http://www.youtube.com/audiolibrary?feature=ctsbs
Downloading and Using Video in the Classroom
There is little doubt that video engages kids. The evidence of that reality stares me in the face each time I watch my three-year-old daughter become slack-jaw while watching her favorite television show. As an educator, I know that we need to harness that kind of power in our efforts to engage students.
However, video is a difficult world to deal with when it comes to the Internet. The quality and size of video files causes it to suck up a lot of network resources (meaning that other people cannot access what they may need to teach or learn). If you have ever suffered through a “choppy” video that plays faster than it streams to the computer, you’ve dealt with this frustration. It becomes especially difficult to justify that constraint on resources when you walk into the neighboring room of people crowded around a computer, all laughing uncontrollably at the latest viral video.
Of course, there is also the issue of the appropriateness of content. You understand that if you have ever shown a YouTube video (that you’ve previewed and decided is appropriate) to a class and then had a host of “suggested” videos appear on the sidebar with less than appropriate subject matter. In my case it was a video on “mob mentality” that returned pictures of scantily clad people dancing and a video on a dog breeding program (you can imagine what the images for that one looked like). Needless to say, I lost my audience before the intended video even started.
With that said, there are ways to get the upper hand on Internet video to maximize its power and limit its distractions. Below are several ways that you can capture Internet videos in order to share them with your students.
*Disclaimer: The world of Internet video is peppered with lots of technical jargon and elements. Downloading Internet video is more of an “art” than a science at this point. Patience is critical! Also, having a few “methods” to fall back on is helpful.
Internet Overrides
YouTube and other sites are often filtered at school. However, there is little doubt that some educationally valuable content is available on these sites. For this reason, any staff member in my district can use an override code to access these filtered resources. This allows him/her to access any content that he/she may need while at school simply by using the override code whenever he/she encounters filtered material.
If you do not presently have access to these resources at school, perhaps its a conversation starter with your Director of Technology to get the ball rolling in the right direction.
Zamzar.com
Of course, without that option in place, it's nice to be able to "collect" or download Internet video content directly from the web BEFORE going to a filtered environment. If that option speaks to you, you can utilize Zamzar.com to download videos from several Internet video streaming sites.
- First you will need to locate the video you want to download.
- Then, copy the URL and open another browser window to http://www.zamzar.com .
- On the green box in the center of the page, click the second tab, which reads “Download Videos”
- Under “Step 1” paste the URL of the video into the text box
- Under “Step 2” choose one of the following formats:
- FLV – if you want to place the video directly into a SMART Notebook file
- WMV – if you want to play the video with Windows Media Player
- Under “Step 3” enter your school email address and then click “Convert”
- Zamzar will send a link to your email inbox. This is not an immediate process, but if you have not received the link within 24 hours, check your “Junk Email” folder.
- Click the link emailed to you, click “Download Now” on the web page, and save the file to your computer.
| Pros: | Cons: |
| -Reliable download of videos | -Slow process; may take hours to receive email from Zamzar |
| -Lots of file formats available | -Small video files only; 100 mb limit |
ClipNabber.com
Another reliable source that is a bit more streamlined is http://www.clipnabber.com .
- First you will need to locate the video you want to download.
- Then, copy the URL and open another browser window to http://www.clipnabber.com
- In the “URL” box in the middle of the page, paste the address of the video you want to download
- Click “Nab” just to the right of the URL box
- Wait a few seconds, and several buttons will appear below the “URL” box that will indicate the preferred file format and quality of the video for the video you want to download (FLV medium, FLV high, WMV low, etc.). Click on the preferred format and quality.
- Wait a few more seconds and a “Save” dialogue box will appear. Click “Save” and identify where you want the video to go.
| Pros: | Cons: |
| -Faster download process | -Video files formats limited to what is available; not all formats available |
| -Reliable download of videos | -May have to use another service to convert video file formats |
*Not all video players are made equal. If you’ve got a file that won’t play with a standard media player (like Windows Media Player), you may want to download and install another media player – VLC Media Player. You can download VLC at this site: http://www.videolan.org/vlc/
Alternative Video Sites
There are lots of great video sites out there to pull resources from. Here are just a few worthy of mentioning.
School Tube and Teacher Tube
While no comparison to the expansive library of YouTube, School Tube and Teacher Tube are vetted content sources that have systems in place to monitor the content hosted on the site. There is a wide array of educational resources available on both sites.
Find them at: http://www.schooltube.com and http://www.teachertube.com
YouTube Edu
About a year ago YouTube launched YouTube Edu (http://www.youtube.com/edu). Partnering with academics and universities the world over, there is an expansive list of lectures and resources available for free on the site. Hosted on YouTube, you’ll have to access the site using the Internet override you were given, but it has lots of great content that may just fit your classroom needs.
The most important element to remember is that video engages students in a wide variety of ways. Although showing video from YouTube isn't an option that is presently available for every teacher, it is definitely worth the extra effort to pre-plan, download in advance of the class period, and show the video to students using some of the techniques and tools mentioned here.