Teaching Students to Become Image Detectives
When we teach students to read, we teach them techniques for finding context clues within a text. We show them how to annotate text, marking it up so they (and we, as their text guides) can visually identify their thought process throughout the text.
In a visually rich world where students just as commonly encounter visual elements (photos, videos, gifs, emojis, memes, etc.), we should also get serious about teaching students how to "read" the clues and context available within visual media. While marking up text-based media has always been far more common in literacy instruction, we now have tools readily available to annotate or "mark up" images in the same ways to help us uncover their thinking as they observe images.
There are tools available on any device to do this with ease with your students. If you are in an iPad classroom, you can use the Markup tool in the Photos app. If you are using Chromebooks, you can just as easily use Google Drawings to do the same kind of activity in class.
Setting Up a Successful Image Detective Lesson
Teaching students to look closely as images is not a new idea. Teachers have long used images to capture a student's interest an attention, to create context, or to encourage students to ask questions about a topic/subject. However, to help students develop the skills of being image detectives, we need to carefully select the right images and utilize the right tools to let students "uncover" the key clues.
The process starts with three key components: a topic, a driving question, and interesting imagery.
Topic and Question
Every content area lends itself to some level of imagery exploration, so this will work in any classroom. The real challenge is asking questions that students will find compelling, and that can truly be answered by the images that you uncover. To begin, develop a generic question you will have students answer, which will give you a starting point to begin your image search. This is the "rough draft" of your question for students to answer. You will need to be flexible with the question, adapting it to fit perfectly once you find the right image.
Selecting an Image
Images are everywhere on the Internet. However, not just any image will do for this kind of investigation. When selecting an appropriate image for this type of lesson, the goal is to find images that have historical, geographical, or contextual clues hidden within them. There has to be evidence within the image to tell a story, which can in turn provide points for students to consider and discuss.
Let's look at an example of two images. The generic question I want students to ponder is this:
"What is it like for an immigrant to start a new life in a new country?"

The top image is from a wonderful site that teaches students how to become Image Detectives. The lower image is from a Google search which turned up an image from a 2006 immigration march in Washington D.C.
Both are images intimately tied to immigration. The lower image is far more timely, relevant to our students lives, and attractive to view (color, interesting subject, focused). But the upper image -- there is so much more richness of detail. While we could definitely foster a conversation with the lower image, the upper image lends itself to student exploration. And that is exactly what we are looking for when we select an image for students to explore and uncover.
Once you have selected the right image, you can then tailor your question to the image to promote even richer thinking and conversation.
"This family that has recently immigrated to America.
What issues may they be confronting as a result of this life change?"
Using Technology to Annotate Images
For those in an iOS/iPad environment, marking up images on the iPad has become very simple. You no longer need an additional application. The Markup function on the iPad comes baked in iOS 10 and beyond.
Start by distributing the image to your students so that every student has a copy of the image on their device in the camera roll. This can be achieved in a number of ways. Whether using the AirDrop function (especially if you use Apple Classroom where you can AirDrop to all students with one click of a button), or just placing the image in Google Drive or on a class website, the goal is for the students to save the image to their iPad Photos.
Next, your students will be accessing the Markup tool in the Photos app (yep, the one that came with the iPad!).
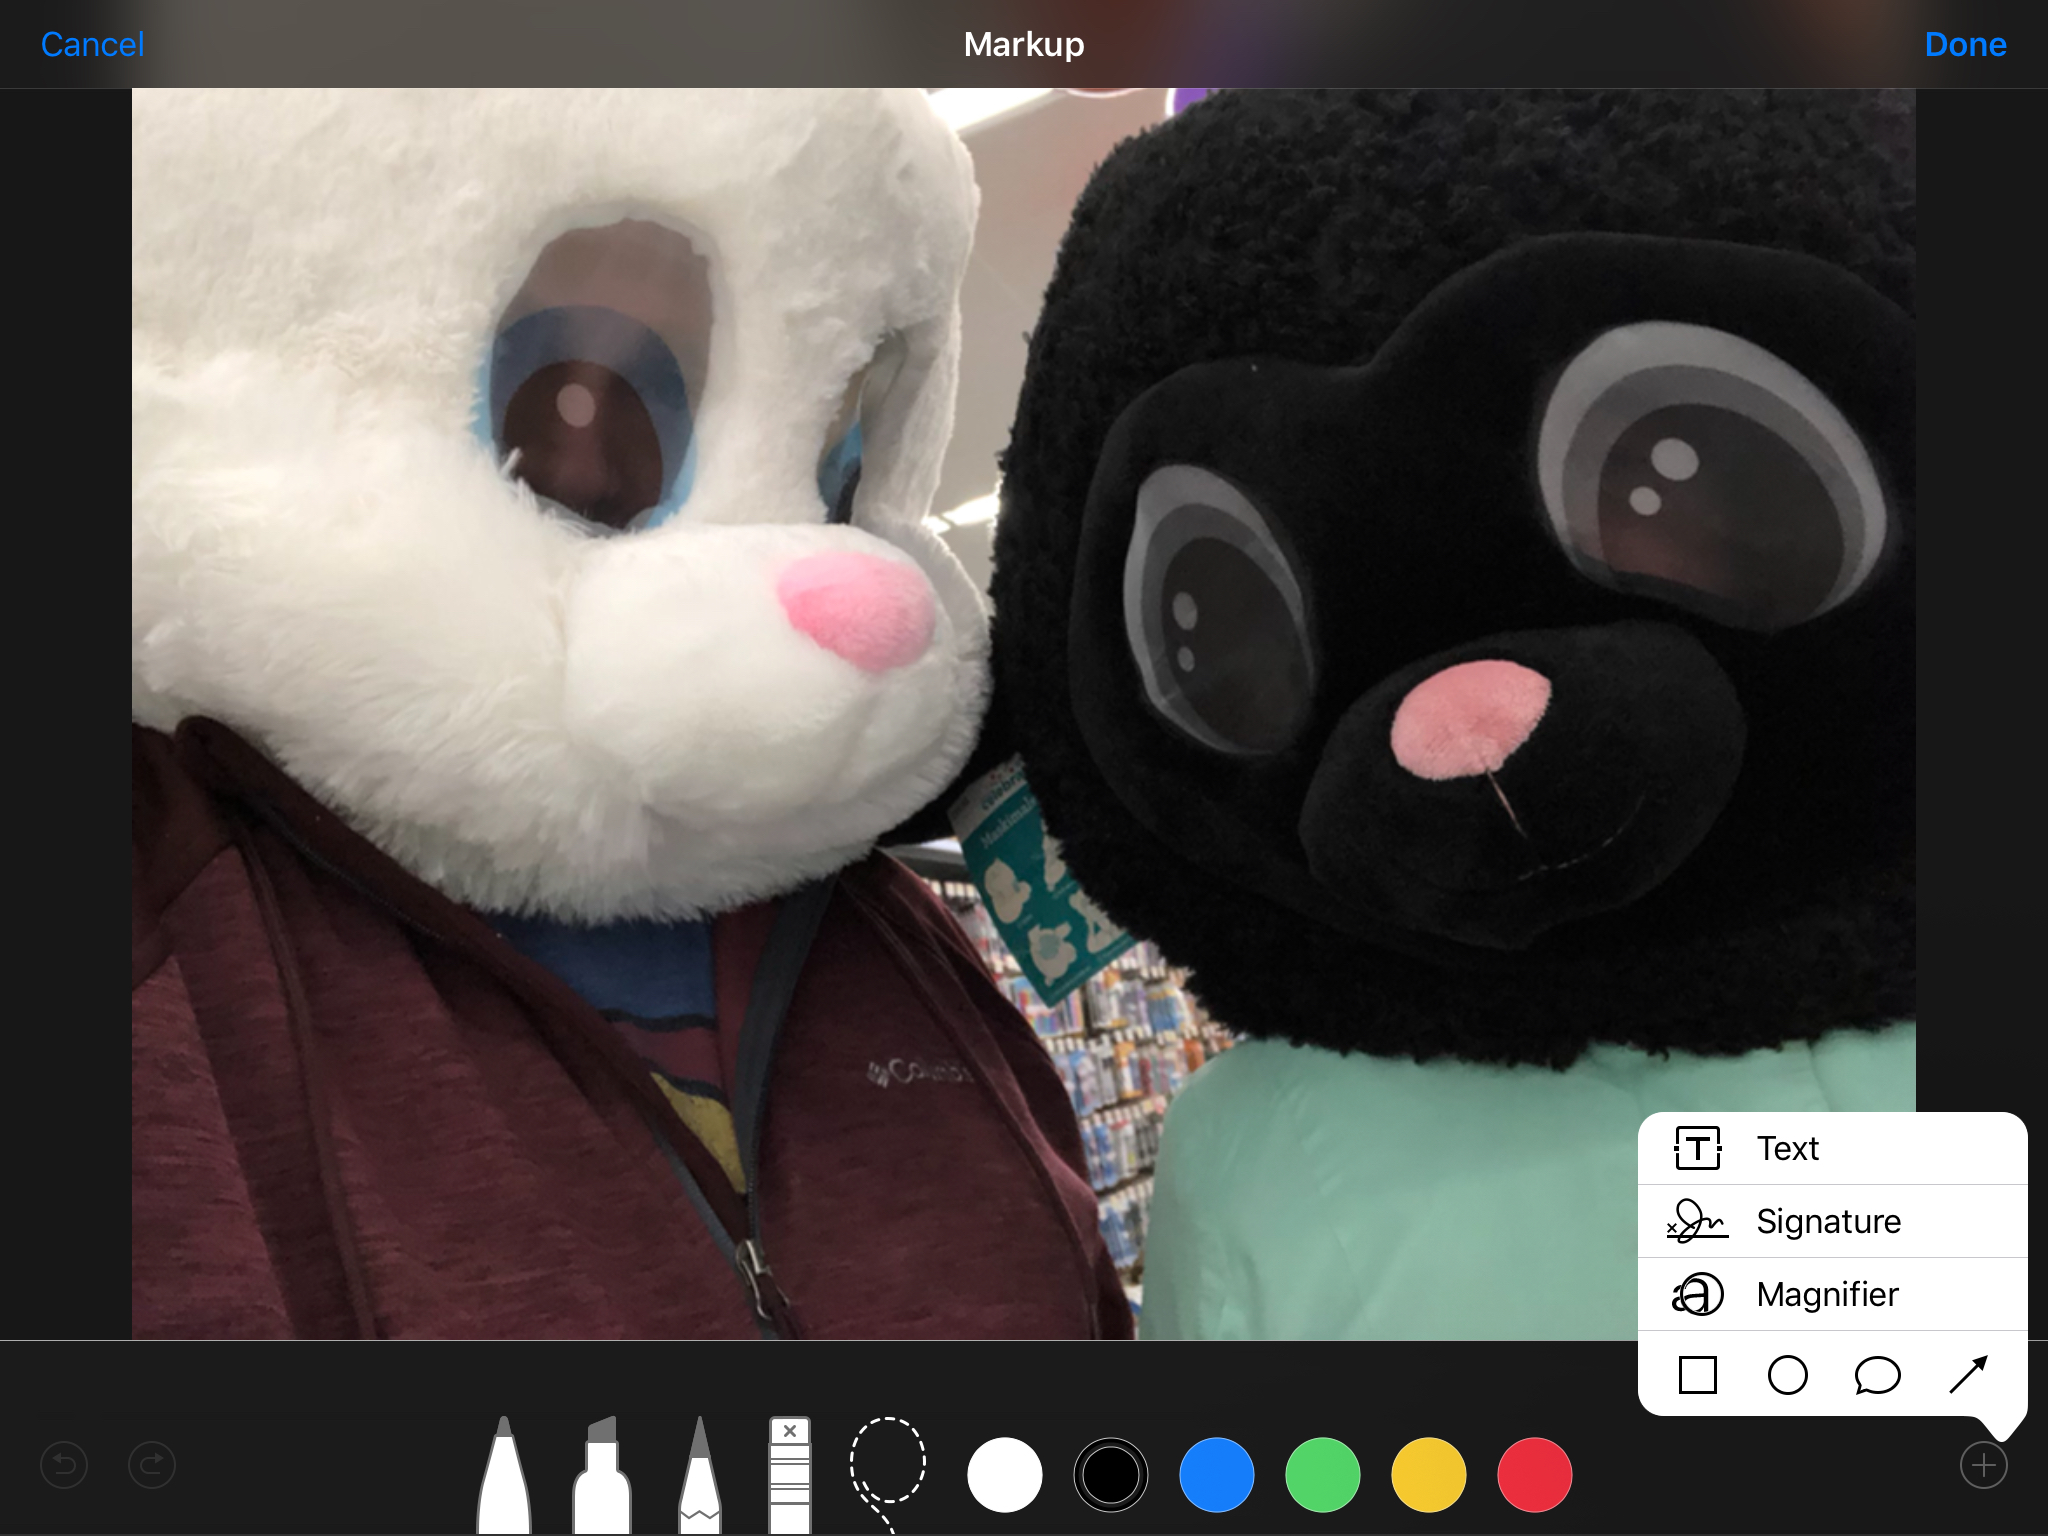
A full range of image editing tools will appear as a part of the "Markup" tool set.
- Open the Photos app, tap on the image you shared with your students, and "Select" the image.
- Then click "Edit" to reveal the editing tools, and select the ellipsis button (three dots).
- Select the "Markup" tool. The drawing tools will appear.
- When finished, select "Done" and the drawings/text/shapes placed on the image will be saved as a part of the image.
You will need to teach students how to use some of these editing tools to produce better results. For instance, instead of handwriting on the image with the pen, use the text tool to type to make the writing smaller and more legible. Use shapes and arrows to point out specific details in the image. Use the pinch gesture to zoom in and out of the picture to get close to the details while drawing on the image.
Here is an example of the work a student might produce.

Notice how typed text makes it easier to read. Also, using color can help point out different types of details the student has uncovered in the image they are annotating.
While Markup works in the iOS/iPad environment, there is a similar tool that works on Chromebooks and computers: Google Drawings. (Drawings does NOT work on the iPad at this time.)
This instructional video from Kelly Hollis (@hollis_k) will demonstrate a similar process for marking up images using Google Drawings.
Fostering a Conversation for Image Detectives
Depending on the images a teacher has selected, there can be great clarity and agreement on what story is being told in the image based upon the clues that are available, or there can be considerable disagreement and discussion. As with any deep thinking activity, it is important to find ways to have students share their ideas/perspective and listen to the findings/thoughts of others.
One way to do this in an iOS environment is to have students AirPlay their image to the classroom Apple TV if one is available. Here every student can quickly and efficiently share their ideas. Another way to do this is to have students select a partner and AirDrop their individual image to their partner for review and discussion.
If you are in a Google environment, you can easily share Google Drawings with another student to start the conversation.
Sometimes the details in an image can be rather limited. There may not be enough details to uncover for all students to have an opportunity to share. This does not mean, though, that any student should be allowed to opt out of sharing their thinking. To be sure all students get a chance to share, you can use Padlet to foster an online conversation. (I know that Padlet has become far more limited since introducing their pay model, but even if you only have three free Padlet boards, you can at least spark a conversation in your classroom. Remember -- for ed tech companies to exist at all, they need to be able to make a profit.) You could just as easily use a Google Doc or Google Slides presentation, though, shared with all students allowing them to upload their images to the presentation or document.
The key is reflection and debriefing. How can you get your students to talk about what they have uncovered? When students talk about their thinking, they learn! And that is the ultimate goal in any activity we do with students.
Feel free to share your ideas in the comments below about how you have encouraged your students to become image detectives. What tools have you used? What have you witnessed for results in student learning?