

Removing barriers to MEANINGFUL technology use!
The e-Submission Insanity: Taking Control of Digitally Submitted Work -- Part 2
In our last article, we talked about the importance of crafting (and insisting upon) a naming strategy for digitally submitted work. This alone can be a valuable management strategy, but staff can put other measures in place to maintain a sense of sanity as more student work is turned in online.
This post focuses on a Folder Sharing/structure solution within Google Drive.
The Folder Sharing Concept in Google Drive
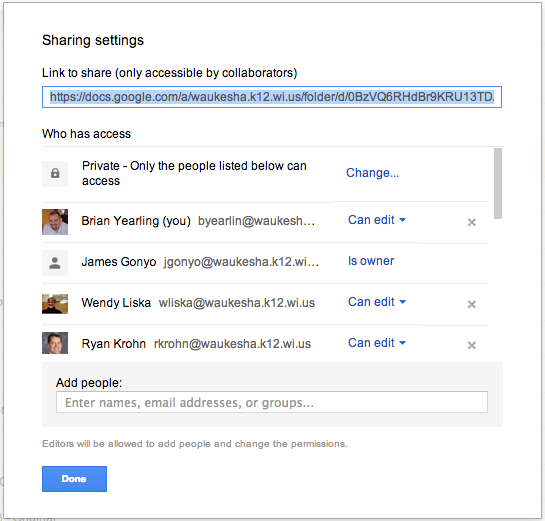
One of the core truths in Google Drive is that when a folder is created in Drive, the "properties" set for that folder are transferred to any documents or files within that folder (unless otherwise specified).
"Properties" refers to a few key elements when a user clicks the "Share" button on a folder or document in Google Drive:
- Whether that document is "Private," available to people within the domain, or open and available to the world, and
- Who specifically is being invited to view, edit, and comment on the document
The Folder Sharing Concept, then, focuses on using this principle to eliminate later confusion/frustration as students create one folder, set the sharing and viewing properties properly once for that folder, and then simply place all course related work in that folder for the rest of the year. This keeps an open line of communication between the student's course folder, and the teacher's access to that folder.
Setting Up Folder Sharing with Students
It is recommended that a teacher launch the Folder Sharing system with all of his/her students at a time when it makes sense to change fundamental operating procedures within the classroom. Moving all students at once to this system will make the transition cleaner and more manageable for the instructor. It also allows the classroom culture/expectations to shift at once.
Step 1: Develop a clear folder naming practice and general sharing guidelines to achieve consistency
- How do you want student folders to be labeled? (For student's organization, do more than just their name! Especially if they have more than one teacher.)
- Last Name, First Name - Subject
- Last Name - Teacher Name
- Last Name, First Name - Subject - Semester
- Do you want folders inside of that folder (nested or sub folders)?
- What level of sharing would you like students to give you? Viewing? Commenting? Editing?
- Editing is recommended...it gives you fullest access to the folders and files
Step 2: Create a "Class Folder" for your class(es) in your Google Drive
- Once students share a folder with you, it will benefit your efficiency to place those folders into a collective folder. Name the folder with clear identifiers, though. "American Lit - 2012 - Sem1"
Step 3: Reserve a lab/cart/computers and have students create the folder as a class
- While students can create this independently, it is worth the time and effort to be present to answer questions and to make sure the folder is set up properly the FIRST Time.
Step 4: As students share the folder with you, check the properties and drag into your "Class Folder"
- When the file arrives in your inbox, or in your Google Drive folder (look in "Shared with Me"), take a look at the properties to be certain they are set properly. Then, simply drag the folder up into the proper "Class Folder" in your Google Drive.
- You will not delete student access to the folder in dragging this into the "My Drive" section of Google Drive. It simply makes it easier for the instructor to find like student folders.
Step 5: Instruct students to place all work that is to be digitally submitted into that folder
- Remember that all files within that folder will take on the "properties" of the folder, unless otherwise specified by the student.
- Developing a file naming structure/code for the files in each folder will further assist instructors in efficiently assessing the work within that folder.
Tips to Teachers
 While the system is fairly simple and easy to use, there are some strategies that will make this work more seamless.
- Clear initial expectations will ease the student transition to a new turn-in model. Avoid accepting paper versions of the work when possible if the expectation is primarily electronic submission.
- Prior to using Google with students, determine if they have an active Google account with the district. The easiest method is to have students attempt to log in.
- Encourage students to share their folders with a parent/guardian as well.
- Even without a Google account, parents can view (and even comment/edit) the work. Here's a link to an article explaining options for sharing with non-Google users.
- Use commenting on docs shared with you to provide feedback. Printing assignments and placing feedback on the printed copy defeats the purpose of e-submissions (and creates another step for you -- so much for efficiency gained).
- Engage students in a discussion about the work using the discussion tool in Google Docs.
- Check in often. You'll be amazed at how quickly work piles up. Even when it isn't due!
The e-Submission Insanity: Taking Control of Digitally Submitted Work -- Part 1

An example of a Google Drive folder when students have used a
a standard file naming convention to submit work.
There are tradeoffs for everything.
The "paperless" world of electronically submitted assessments/homework is truly a gift for those of us who struggle to keep tabs on the zillion+ sheets of paper we collect each year.
Yet, the tradeoff is having to develop a new system for management of our digitally collected student work. For many educators initially encountering Google Drive, or other collection tools for electronically submitted work, you may have this overwhelming feeling that your digital work environment is no more functional than a cluttered work space in the physical world.
Ready yourself for the good news! By adopting a few simple strategies, and by training your students to use those strategies religiously, you can regain your own sanity and become far more efficient in collecting and providing feedback on digital assessments.
Developing a Consistent Naming Convention
For many teachers, the process of paper collection has become a carefully crafted venture, At the very least, most teachers have a protocol for students when it comes to turning in physical papers. Name on the upper right of the page. Hour, period, and/or date just below that. Top left margin has assignment name. For many teachers, a similar naming/identification process has become the only way to keep tabs (and our sanity) on the flood of paperwork we consume regularly.
The movement to a digital collection platform will not shirk the need for a digital naming/identification equivalent. In fact, without identifying some sort consistent convention, and then STICKING TO IT, you may not be able to take advantage of some of the other niceties of digital collection (automatic time-stamping when assignments are collected, search and sort functions to easily find text within specific documents, and more).
The most beneficial naming convention in a digital platform is one that places the critical data in immediate view of the teacher without having to open the file/document to find the data. Generally this is done best in the document's name.
One example of a properly named document might be:
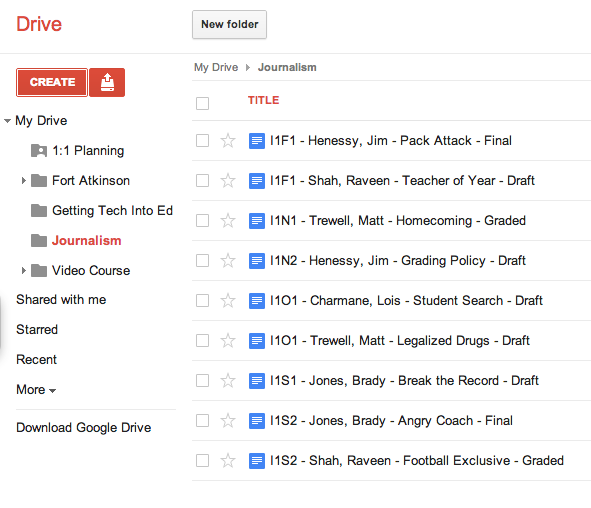 An example of a Google Drive folder when students have used a a standard file naming convention to submit work.
|
What is an assignment code? |
- The teacher is "under the gun" to provide prompt responses, so he/she is constantly opening files to see the status of the work (many kids will submit the work to you before it is done...we'll talk about that as well in a follow-up post). Much of that work is incomplete, leading to teacher frustration, and/or wasted teacher time. In this scenario, we've lost all of the efficiency of a digital turn-in system.
- Response time to student work is dramatically hampered because the teacher sets an arbitrary date for "review and response" to maintain sanity. As a result, students fall into the same old habits of waiting until the last minute to complete work. We've now lost momentum and enthusiasm for a more personalized, fluid turn-in system. This system is truly no different than a system where students turn in work physically on the due date and await the teacher response.
- Draft: This meant that the student had not completed the work and was not awaiting my feedback as an instructor. For me, this meant that I did not need to open that document and offer feedback at this time, unless the student communicated with me personally and asked for assistance.
- Final: This meant that the student had "completed" the work and was awaiting my feedback. As soon as I saw "Final" in the title, I opened that document and began to comment and assess. I did this even BEFORE official due dates, as the student was indicating he/she had submitted his/her best work at that time.
- Graded: I renamed the file "Graded" when I was finished offering feedback to the student. It was an indication to the student that there was some level of feedback in the document for the student. Even if I was sending them back to complete another draft with revisions, I indicated graded. When the student switched the work back to "Draft," I knew that the student had accepted my comments and was going to try again. Other students accepted the grade that I offered and elected not to revise, leaving the code "Graded."
As always, you will have to flex for some students. Be aware that some students are having their own struggles adapting organizational strategies to a digital world. The most important factor in all of our work is student learning -- a rule or naming convention should never get in the way of a student demonstrating what they have learned. Flex when you need to. Getting 95% of the students on board with your system will make managing the unique cases more palatable.
Advanced Google Search - Finding Reading Levels of Resources
I'm going to disturb and unsettle some Library Media Specialists here for a second (I'll redeem myself in a bit), so please stick with me.
Most people think they generally know how to search the web. In fact, some of us think we are pretty good at searching the web and finding valuable resources. However, when you look at the tricks and tips most of us actually employ to complete those searches, it's actually pretty unimpressive and without much strategy. Sadly, those unimpressive search strategies are the exact same strategies we "relay" to our students if educators don't take a more progressive view of systematic digital resource research.
The harsh reality is that most of our searches start with Google. And so do most of our students. While we may wish they started in databases (or at least proceeded to them in deeper research), they typically do not. I challenge all of you who have the luxury (sadly it has become that in so many schools) of a Library Media Specialist available in your building to help you rethink that approach when teaching research to your students. These folks are experts in this area and can really jump start some high quality ideas and lessons that will be invaluable to your students today and in the future.
Let's say, though, that we were to stick to Google alone. Did you know that Google has an Advanced Search feature that really drills down into some focused and interesting results.
I'm going to let another Waukesha instructor, West's Mark Grunske, share his nifty little tip about using Google's Advanced Search to find appropriate resources on the Internet based upon the reading level. As you visit Mark's blog, you'll see the details of how to do this. Go and try it yourself. And in doing so, you'll see lots of other Advanced Search options that may make you see how valuable having a little bit more systematic, advanced search strategies (even in Google) can be in finding the digital information you REALLY want!

From Mark Grunske's blog:
"This month's Google tip deals with finding appropriate readings for students at different reading levels........
When I first saw this trick, I immediately thought of all of our work in AO as well as the current leveling in Science and the similar changes coming to English and Social Studies............To search Google for sources sorted by reading level all you have to do is the following......."
Read the rest of the article at Mark's blog - Google, Gadgets, and Grunske - Reading Levels.
And again, visit your Library Media Specialists to start exploring how we can teach kids to be better "seekers" and "finders" of information. In a world where everything is digital and the accessibility to information continually explodes, these critical skills are as an important as being able to read the resources once our students have found them.