

Removing barriers to MEANINGFUL technology use!
The e-Submission Insanity: Taking Control of Digitally Submitted Work -- Part 2
In our last article, we talked about the importance of crafting (and insisting upon) a naming strategy for digitally submitted work. This alone can be a valuable management strategy, but staff can put other measures in place to maintain a sense of sanity as more student work is turned in online.
This post focuses on a Folder Sharing/structure solution within Google Drive.
The Folder Sharing Concept in Google Drive
One of the core truths in Google Drive is that when a folder is created in Drive, the "properties" set for that folder are transferred to any documents or files within that folder (unless otherwise specified).
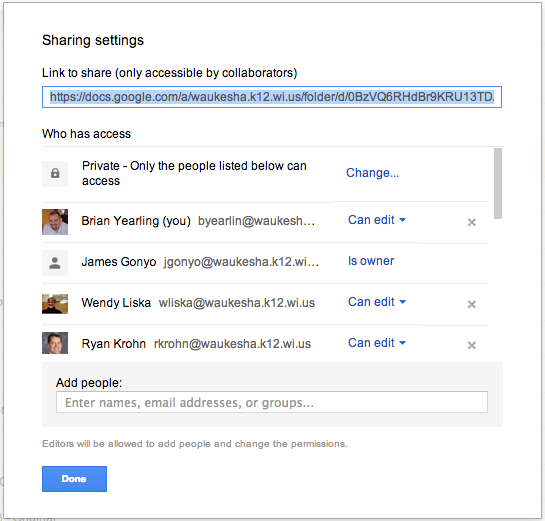
"Properties" refers to a few key elements when a user clicks the "Share" button on a folder or document in Google Drive:
- Whether that document is "Private," available to people within the domain, or open and available to the world, and
- Who specifically is being invited to view, edit, and comment on the document
The Folder Sharing Concept, then, focuses on using this principle to eliminate later confusion/frustration as students create one folder, set the sharing and viewing properties properly once for that folder, and then simply place all course related work in that folder for the rest of the year. This keeps an open line of communication between the student's course folder, and the teacher's access to that folder.
Setting Up Folder Sharing with Students
It is recommended that a teacher launch the Folder Sharing system with all of his/her students at a time when it makes sense to change fundamental operating procedures within the classroom. Moving all students at once to this system will make the transition cleaner and more manageable for the instructor. It also allows the classroom culture/expectations to shift at once.
Step 1: Develop a clear folder naming practice and general sharing guidelines to achieve consistency
- How do you want student folders to be labeled? (For student's organization, do more than just their name! Especially if they have more than one teacher.)
- Last Name, First Name - Subject
- Last Name - Teacher Name
- Last Name, First Name - Subject - Semester
- Do you want folders inside of that folder (nested or sub folders)?
- What level of sharing would you like students to give you? Viewing? Commenting? Editing?
- Editing is recommended...it gives you fullest access to the folders and files
Step 2: Create a "Class Folder" for your class(es) in your Google Drive
- Once students share a folder with you, it will benefit your efficiency to place those folders into a collective folder. Name the folder with clear identifiers, though. "American Lit - 2012 - Sem1"
Step 3: Reserve a lab/cart/computers and have students create the folder as a class
- While students can create this independently, it is worth the time and effort to be present to answer questions and to make sure the folder is set up properly the FIRST Time.
Step 4: As students share the folder with you, check the properties and drag into your "Class Folder"
- When the file arrives in your inbox, or in your Google Drive folder (look in "Shared with Me"), take a look at the properties to be certain they are set properly. Then, simply drag the folder up into the proper "Class Folder" in your Google Drive.
- You will not delete student access to the folder in dragging this into the "My Drive" section of Google Drive. It simply makes it easier for the instructor to find like student folders.
Step 5: Instruct students to place all work that is to be digitally submitted into that folder
- Remember that all files within that folder will take on the "properties" of the folder, unless otherwise specified by the student.
- Developing a file naming structure/code for the files in each folder will further assist instructors in efficiently assessing the work within that folder.
Tips to Teachers
 While the system is fairly simple and easy to use, there are some strategies that will make this work more seamless.
- Clear initial expectations will ease the student transition to a new turn-in model. Avoid accepting paper versions of the work when possible if the expectation is primarily electronic submission.
- Prior to using Google with students, determine if they have an active Google account with the district. The easiest method is to have students attempt to log in.
- Encourage students to share their folders with a parent/guardian as well.
- Even without a Google account, parents can view (and even comment/edit) the work. Here's a link to an article explaining options for sharing with non-Google users.
- Use commenting on docs shared with you to provide feedback. Printing assignments and placing feedback on the printed copy defeats the purpose of e-submissions (and creates another step for you -- so much for efficiency gained).
- Engage students in a discussion about the work using the discussion tool in Google Docs.
- Check in often. You'll be amazed at how quickly work piles up. Even when it isn't due!
The Google Research Tool within Google Docs
You've been there. The open books, magazines, and resources spread out on the table, head snapping between the key words and quotes from the text and the notepad (or better yet, index card) on which your notes (and citations) will be stored for the research paper you will need to write eventually.
With a little help from technology, at least one part of that equation can be eliminated -- the painstaking (and often inaccurate) handwritten copying of research resources, quotations, and key elements.  With the update to Google Drive (formerly called Google Docs), a few other key updates were made. The Google Research Tool is one of those updates. The Research Tool (available when you are in a Google Document by clicking on Tools --> Research Tool) keeps your Google Document open on the left side of the screen, and then place a fully functional research window on the right side of the screen. Search Google from right within your Google Doc, find resources, images, quotes, or even use Google Scholar.
The beauty is that resources, citations, images, and quotes can all be dragged into your document with LIVE LINKS to the resources for later exploration. It's kind of like turning the world of resources available on the web into a stack of selected resources from the stacks of a library, all sitting right there on your research resources piles.
Pretty impressive, but more importantly, very efficient. Have your students regain their focus on the reading and selection of the resources instead of on the handwritten copying of that research (and citations, if they remember to do so) on to note cards or pads, to later re-write or type those citations into the actual paper. Imagine the efficiency!
Infographic to Pinpoint the Right Google Tool for the Job
I've created a flow chart for our teachers to utilize as they begin their exploration of Google Apps. It leads with the statement, "I would really like to have my students..." and then their are a series of follow-up activities that teachers may have students do. They are grouped by the Google tool that may best suit that need.
Teaching with Google Apps Infographic