

Removing barriers to MEANINGFUL technology use!
Take another look at Book Creator app: New tools, more options
If you have been looking at the same standard Book Creator app over the past few years, I have some exciting news: It's time for an update!
Before outlining some of the key new tools and changes in Book Creator, let's do a check to see if your Book Creator app is up-to-date. Pictured below is the newest Book Creator home screen. Open up your iPad, start Book Creator, and compare.
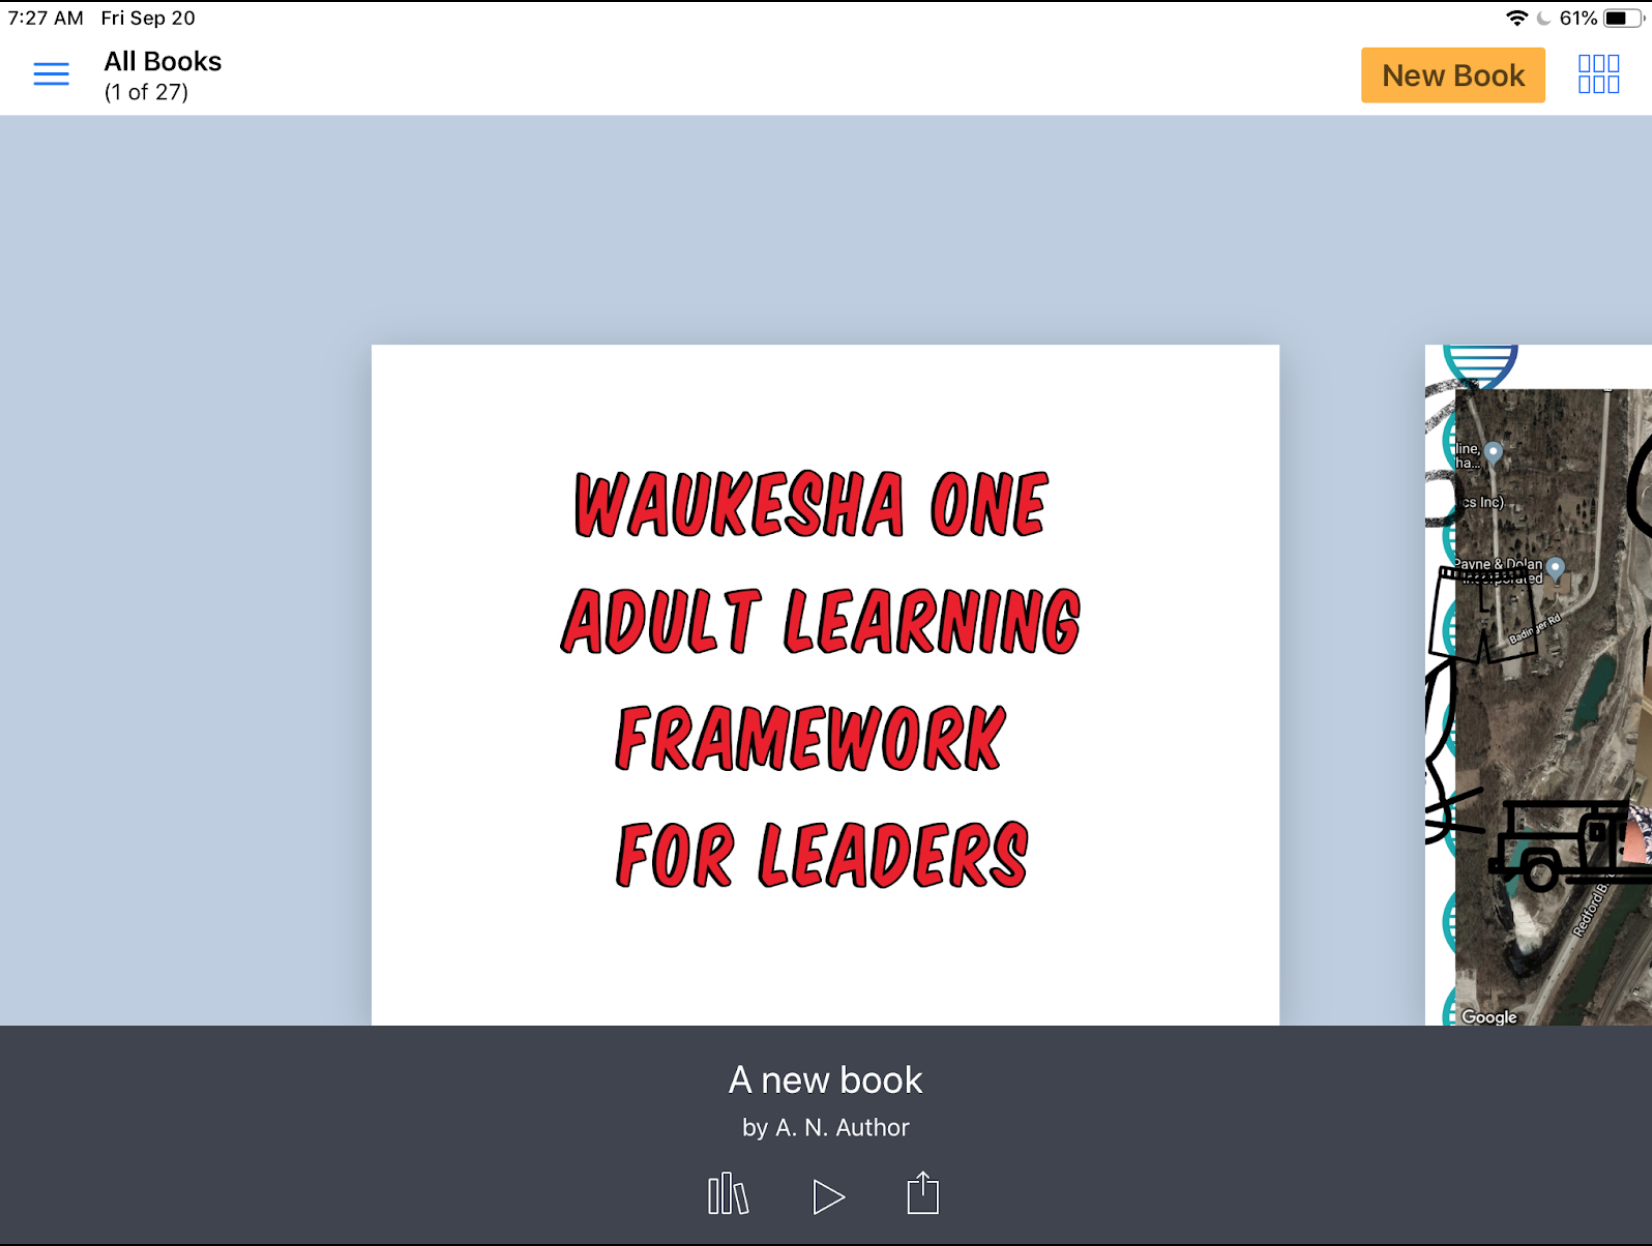
If your Book Creator app does not look like the one pictured above, you will need to do an update of the app (and so will your students). Once updated, welcome to the marvels of Book Creator 5.3.0. This is an opportunity to re-ignite your enthusiasm about Book Creator, no matter what grade level you teach. (Seriously, Book Creator is robust enough to handle every subject and all grade levels!)
New Feature for Teachers: Teacher Resources

The Book Creator developers and community are committed to supporting educators who use their product. In the newest update you'll see an offer for teachers to join the Book Creator community in the lower left of the screen (it will later be located in the upper left under the menu icon, which looks like three blue horizontal lines).
Signing up for the Teacher Resources is easy, and can inspire new ideas for educators at all grade levels. If you have stayed away from Book Creator because you cannot determine how it could be useful, take a few minutes to explore the sample books made by students and teachers from across the world. These books unveil how the tool is being used to showcase learning in every subject area. These books also show off just how powerful Book Creator really is with a creative mind.
New Feature for Teachers: Publish Books Online
One hang-up of Book Creator has been sharing student work with others who do not have the Book Creator app. The developers have tackled this challenge for classroom teachers. Once teachers have created a free teacher account, they can now publish these books online using the ePub format. This keeps video and media (including audio recordings) in place, and makes them accessible to anybody online, regardless of the device they use to view the book.
Learn more about the free online publishing of Book Creator projects for teachers by visiting this link.
New Tool: Updated Pens and Auto Draw
The pen tool has gotten a makeover in this update. Book Creator pens now come in varying sizes, ink colors, and styles. Draw with the pen, color with the crayon, use the highlighter, change the size of the drawing tip, and add some flare with Magic Inks.
However, the most notable update is the AutoDraw pen. Sketch noting is a powerful method for taking notes intertwined with drawing, but for the artistically challenged, later determining what the drawing was supposed to be can be a brainteaser of its own. Start drawing with the Auto Draw pen and Book Creator will offer some clip art suggestions based on what it thinks you might be trying to draw. Tap the preferred image and immediately have a professional looking icon representing your thinking or ideas. It's hard to believe it is as easy as I have explained. Give it a try to find out for yourself.
New Tool: Include Maps
Geography is hardly something that can be overlooked when studying any topic, but it is also a subject area that is difficult to generate interest in when taught out of context. Book Creator now allows users to embed a map from anywhere in the world that will allow geography to be a part of the showcase of learning. And it's easy.
Tap the Map tool in Book Creator. Then simply search for a location, pinch to zoom, select the layers of the map you want to view, and click Done. You now have a map inside of your Book Creator project. Mix that with the pen tools and you have a way to annotate directly over the top of your maps.
New Tool: Adding Files from Other Apps
Things are about to get very exciting for teachers who want students to incorporate all of their work in one place (this can be read as: "If you are thinking about portfolios, consider exploring this tool!").
Book Creator users can now add Files from other apps directly into the pages of their Book Creator project. This can include files stored in Google Drive, stored in the Files app on the iPad or even stored in iCloud Drive. Teachers will probably want to try this one out before jumping into a full class demo of it, but the possibilities this opens up are quite awe inspiring. Learn more about how to add files to Book Creator projects by clicking here.
New Tool: Embed from the Web
Want to bring the flashiness of the Web into your Book Creator projects? With the Web Embed tool you can. This actually is incredibly easy to use by simply pasting a web address into the provided box and letting Book Creator do the rest. It is equally powerful, allowing users to incorporate a specific web object using embed code. If your aim is to focus students on a specific website, or point them to unique experience on the web, without having them get lost down the rabbit hole of web searches, this might be a great tool to consider. Learn more about the Web Embed tool in Book Creator by clicking here.
Tool Update: Incorporate GarageBand Recordings in Book Creator
This one is not a new tool, but still a noteworthy feature. Book Creator does have an audio recording tool built in, but in many cases students want to have more flexibility and creativity with their audio recordings. GarageBand will allow them that flexibility. The question for some teachers is, "Where do we go with GarageBand recordings when they are finished?"
There is a method for incorporating those GarageBand recordings into Book Creator projects (quite easily, actually. I'm going to refer you to the experts on the subject here, as the Book Creator team is committed to continually updating their documentation on subjects like these with each iOS update. Take a look at the tutorial available here to learn how to incorporate GarageBand created audio files right into your Book Creator projects.
Honor great teachers: Live and teach their lessons
Coming off of a week filled with wide-ranging public displays of appreciation for teachers, it is heartening to see that there is still regard for the people who spend so much time focused on growing and inspiring young people. The gestures during teacher appreciation week demonstrate the parent and student appreciation for the daily efforts of teachers committed to educating students.
I do not believe, though, that appreciation (including lunches, gift cards, and candy) is the same as honoring our great teachers. Yes, teachers appreciate these kind gestures, but they are not the reason the really good ones show up to work each day. This is not why they arrive early to lead clubs, stay late to help students or meet parents, or work after their kids go to bed to finish lesson planning or grading. Gestures of appreciation are not the reason that teachers go to great lengths to model in their personal lives what they teach their students in the classroom (for instance, being sure to take that extra moment to stop and say hello to families in the store or at the movies, or being mindful to avoid contact with students on nights when they are engaging in certain social adult activities). The really great teachers — they do not live the life of a teacher because they are fueled by gestures of appreciation.
Great teachers are great because they believe in the power of guiding and supporting others as they grow. Great teachers know that every person is born with the potential for greatness, regardless of his/her circumstances. And they know that despite the circumstances a young person faces, that person can make the decision to fulfill their potential. Talk to teachers about kids, about their students — you can truly feel that deep-seated belief within great teachers.

Pictured are two of my great teachers - Don Green and Chris Bichler. These two men taught me more about life at a young age than I was prepared to learn. Thank you!
This week I will have the opportunity to honor one of my great teachers in his final journey. Chris Bichler was my high school history teacher, football and wrestling coach, mentor, inspiration, and eventually became my colleague and friend. He passed away on May 3 after a long fought battle with cancer. Serving as one of his pallbearers, I will have the great privilege and honor of physically carrying Chris in his final departure. However, it is not lost on me that even though Chris is not physically here with us any longer, the spirit of Chris, and of all great teachers, lives on in all of us who had the distinct pleasure of being formed by them. I carry Chris with me in every aspect of my life.
So, how do I best honor Chris? How do we all honor our truly great teachers who have given us so much? Here are a few ways:
Be your best you every day. Take no days off from giving life everything you have and rising above whatever challenges stand in front of you. Think back to those really great teachers — isn’t that what they were encouraging that younger version of you to do? If they could be by your side every day, wouldn’t they still be cheering for you, encouraging you to take a chance, be your best, and go for it. Use that inspiration, their belief in you, to be the best you.
Help others to rise to their potential greatness. Great teachers believe that every person can be great, even when those people struggle to believe in themselves. Think back to those great teachers. The kids in your class, the ones you did not know the personal stories of at the time, the ones who were facing insurmountable odds, your teacher believed in them just as much as they believed in you. To truly honor those great teachers, take a page out of that same playbook and carry the belief that the people around you today are capable and deserving of reaching their full potential. You can help them get there. Maybe it is having faith in your kids, encouraging your spouse, or coaching a significant other or family member. Maybe it is giving an aging employee at the end of his/her career an opportunity to re-ignite his/her passion by trusting them to learn a key new skill. Or maybe it is just acknowledging great effort (no matter how small the task) wherever you see it, or offering caring feedback when you do not. Own the responsibility to help others along their path in the same way that your great teacher did for you many years ago.
Share their lessons. My daughter loves quotes. She uses them regularly, writes them in her room and on her notebooks. She said to me, “I feel like those quotes are teaching me lessons.” They are. Those are great teachers, people she has never met, sharing great nuggets of wisdom with her. The great teachers you have had along the way have shared great nuggets of advice and wisdom with you. It is now your turn to pass them along in support of others. Talk about your teachers. Tell their story. Share their passion, their wit, confidence, quirkiness, and wisdom. Use their lessons. Great teachers believe that together we can change the world, and telling their story and sharing their wisdom is probably the most important way you can honor them.
Say thank you. Now that I am no longer able to express my gratitude for all that Chris taught me, I am so thankful I was able to tell him how much I appreciated him and his efforts in shaping me. Be sure to seize that opportunity for those great teachers in your life. It does not require a visit to your hometown or a grand gesture. Just simply make a point of saying thank you and sharing how that person helped you to become a better person. Great teachers wonder if their efforts have an impact. Assure them that they do.
Lessons from Chris
In honor of one of my great teachers, let me share just a few of the most important lessons Chris taught me along the way. I am honored to share small parts of his story.
Think bigger than your immediate surroundings
I grew up in a small, rural town. The small size and geographic isolation of our town could have become a limiting bubble of my (and my classmates) world view. Knowing this, and knowing the limitation this could have on us for the rest of our lives in shaping how we thought about the world, Chris challenged us to think beyond our bubble. As our coach, Chris constantly reminded us that we were not competing against each other, or competing against kids in our neighboring towns, or competing against kids in our area conference. We had to think bigger — we were competing again teams from across the state, teams throughout history. In constantly reminding us of this, he forced us to acknowledge the larger world that existed beyond our immediate lives, and he helped us to shape a greater perspective of the world that surrounded us. This has entirely influenced my view of the world beyond my own to this day.
Play hard, but show respect for others in the process
Chris was competitive and we played to win, to succeed, to be the best we could be. He taught me to value personal success. However, a mantra he repeated sticks with me to this day: “Play hard between the whistles. Knock them down. And when the whistle blows, pick them back up.” In doing so we learned to respect others, even people we did not know. Working hard, focusing on goals and aiming to be successful — these are important lessons. Equally important, though, is acknowledging that others are giving their best as well, and are deserving of our appreciation and respect. We live in a time where acknowledging the best in others, respecting our differences, and understanding that we are all aiming toward a better tomorrow (even if our values, opinions, and methods are not all in alignment) could go a long way to healing divisive wounds.
Success requires setting clear goals and continual preparation
Whether it was in his classroom or on the field, Chris insisted on goal setting and hard work. He had a motto one season: “If you want to talk the talk, you need to walk the walk.” He acknowledged the importance of setting goals and reminding yourself of those lofty goals. However, his daily routines focused on how goals are achieved: step by step, daily routine, consistency, and effort. Want to do well on that AP History exam? Live the routine of reading the text, making the annotations, and studying. Want to succeed on the mat? Learn to never quit during the grueling practices. Want to be a better teacher? Learn to reflect on your lessons after each day, determine what went well and why, what did not and why, and aim to do better tomorrow. Chris taught us a measured, consistent approach to being well prepared to seize the moment when the opportunity came to achieve your goals.
Teams over individuals - every person brings a unique skill set that can benefit the team
Despite the deepest protestations of many players (and I’m sure some parents) Chris used the platoon system on the field. This means that instead of using the 11 best players on the football field (which was the conventional wisdom of most high school coaches at the time), Chris insisted on fielding a defensive squad of 11 or 12 + an offensive squad made up of another 11 or 12 players. He rotated players, subbed players, and made sure that he prepared the best 22 - 25 players to be on the field throughout the game.
At age 16 it drove me crazy. I believed that putting the best players on the field was the right approach. Chris stood by his conviction that a team of 25 committed, connected players was always stronger than a team of a few really great individuals. Yes, he taught us teamwork, and he taught us commitment. But thinking about how that lesson has played out over the course of my life, I better understand now the value that each individual can bring to a team. When we rely upon a few key people to make our organization great, we see pocketed success. When we expect everybody to use their talents and commitment to make the whole of organization better, our organization benefits in ways that we could not imagine. Additionally, Chris taught me, through this lesson, that having faith in your beliefs matters — especially in the face of frustrated 16-year-old players and their parents.
If you have made it to the end, thank you. And thank you for considering the ways that you will honor the great teachers in your life, and support and encourage the great teachers who are making a difference in the lives of your children, grandchildren, nieces, and nephews.
God bless you, Chris! And thank you to all of those truly great teachers that I have been fortunate enough to know in my own journey. Your lessons live with me every day!
Teaching Students to Become Image Detectives
When we teach students to read, we teach them techniques for finding context clues within a text. We show them how to annotate text, marking it up so they (and we, as their text guides) can visually identify their thought process throughout the text.
In a visually rich world where students just as commonly encounter visual elements (photos, videos, gifs, emojis, memes, etc.), we should also get serious about teaching students how to "read" the clues and context available within visual media. While marking up text-based media has always been far more common in literacy instruction, we now have tools readily available to annotate or "mark up" images in the same ways to help us uncover their thinking as they observe images.
There are tools available on any device to do this with ease with your students. If you are in an iPad classroom, you can use the Markup tool in the Photos app. If you are using Chromebooks, you can just as easily use Google Drawings to do the same kind of activity in class.
Setting Up a Successful Image Detective Lesson
Teaching students to look closely as images is not a new idea. Teachers have long used images to capture a student's interest an attention, to create context, or to encourage students to ask questions about a topic/subject. However, to help students develop the skills of being image detectives, we need to carefully select the right images and utilize the right tools to let students "uncover" the key clues.
The process starts with three key components: a topic, a driving question, and interesting imagery.
Topic and Question
Every content area lends itself to some level of imagery exploration, so this will work in any classroom. The real challenge is asking questions that students will find compelling, and that can truly be answered by the images that you uncover. To begin, develop a generic question you will have students answer, which will give you a starting point to begin your image search. This is the "rough draft" of your question for students to answer. You will need to be flexible with the question, adapting it to fit perfectly once you find the right image.
Selecting an Image
Images are everywhere on the Internet. However, not just any image will do for this kind of investigation. When selecting an appropriate image for this type of lesson, the goal is to find images that have historical, geographical, or contextual clues hidden within them. There has to be evidence within the image to tell a story, which can in turn provide points for students to consider and discuss.
Let's look at an example of two images. The generic question I want students to ponder is this:
"What is it like for an immigrant to start a new life in a new country?"

The top image is from a wonderful site that teaches students how to become Image Detectives. The lower image is from a Google search which turned up an image from a 2006 immigration march in Washington D.C.
Both are images intimately tied to immigration. The lower image is far more timely, relevant to our students lives, and attractive to view (color, interesting subject, focused). But the upper image -- there is so much more richness of detail. While we could definitely foster a conversation with the lower image, the upper image lends itself to student exploration. And that is exactly what we are looking for when we select an image for students to explore and uncover.
Once you have selected the right image, you can then tailor your question to the image to promote even richer thinking and conversation.
"This family that has recently immigrated to America.
What issues may they be confronting as a result of this life change?"
Using Technology to Annotate Images
For those in an iOS/iPad environment, marking up images on the iPad has become very simple. You no longer need an additional application. The Markup function on the iPad comes baked in iOS 10 and beyond.
Start by distributing the image to your students so that every student has a copy of the image on their device in the camera roll. This can be achieved in a number of ways. Whether using the AirDrop function (especially if you use Apple Classroom where you can AirDrop to all students with one click of a button), or just placing the image in Google Drive or on a class website, the goal is for the students to save the image to their iPad Photos.
Next, your students will be accessing the Markup tool in the Photos app (yep, the one that came with the iPad!).
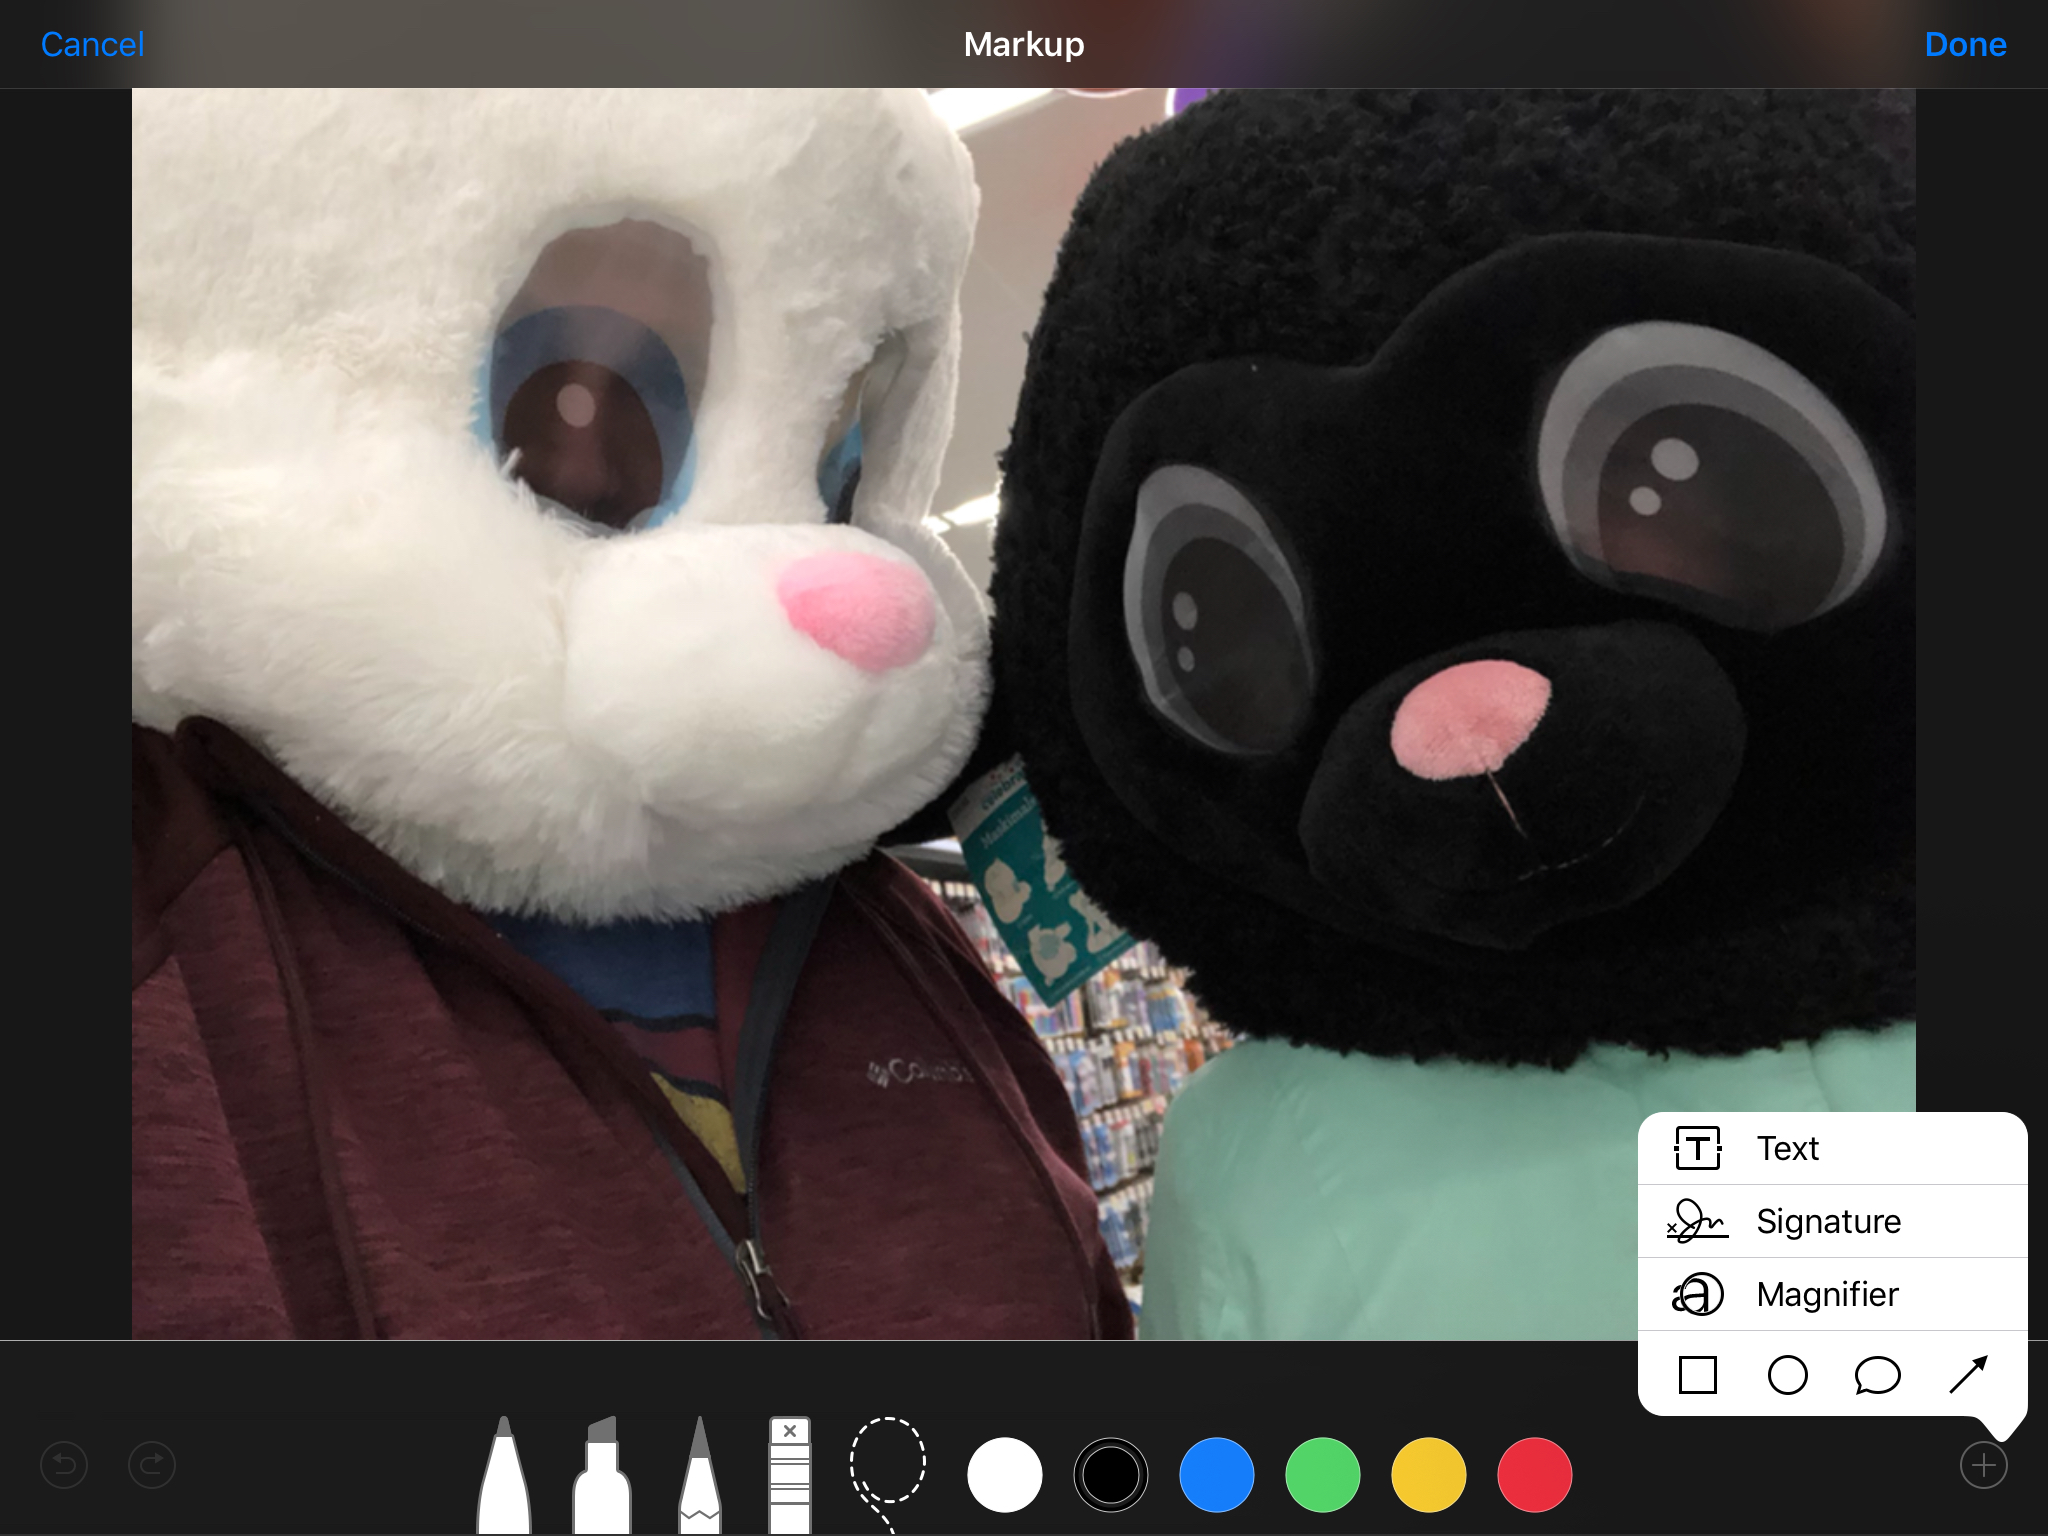
A full range of image editing tools will appear as a part of the "Markup" tool set.
- Open the Photos app, tap on the image you shared with your students, and "Select" the image.
- Then click "Edit" to reveal the editing tools, and select the ellipsis button (three dots).
- Select the "Markup" tool. The drawing tools will appear.
- When finished, select "Done" and the drawings/text/shapes placed on the image will be saved as a part of the image.
You will need to teach students how to use some of these editing tools to produce better results. For instance, instead of handwriting on the image with the pen, use the text tool to type to make the writing smaller and more legible. Use shapes and arrows to point out specific details in the image. Use the pinch gesture to zoom in and out of the picture to get close to the details while drawing on the image.
Here is an example of the work a student might produce.

Notice how typed text makes it easier to read. Also, using color can help point out different types of details the student has uncovered in the image they are annotating.
While Markup works in the iOS/iPad environment, there is a similar tool that works on Chromebooks and computers: Google Drawings. (Drawings does NOT work on the iPad at this time.)
This instructional video from Kelly Hollis (@hollis_k) will demonstrate a similar process for marking up images using Google Drawings.
Fostering a Conversation for Image Detectives
Depending on the images a teacher has selected, there can be great clarity and agreement on what story is being told in the image based upon the clues that are available, or there can be considerable disagreement and discussion. As with any deep thinking activity, it is important to find ways to have students share their ideas/perspective and listen to the findings/thoughts of others.
One way to do this in an iOS environment is to have students AirPlay their image to the classroom Apple TV if one is available. Here every student can quickly and efficiently share their ideas. Another way to do this is to have students select a partner and AirDrop their individual image to their partner for review and discussion.
If you are in a Google environment, you can easily share Google Drawings with another student to start the conversation.
Sometimes the details in an image can be rather limited. There may not be enough details to uncover for all students to have an opportunity to share. This does not mean, though, that any student should be allowed to opt out of sharing their thinking. To be sure all students get a chance to share, you can use Padlet to foster an online conversation. (I know that Padlet has become far more limited since introducing their pay model, but even if you only have three free Padlet boards, you can at least spark a conversation in your classroom. Remember -- for ed tech companies to exist at all, they need to be able to make a profit.) You could just as easily use a Google Doc or Google Slides presentation, though, shared with all students allowing them to upload their images to the presentation or document.
The key is reflection and debriefing. How can you get your students to talk about what they have uncovered? When students talk about their thinking, they learn! And that is the ultimate goal in any activity we do with students.
Feel free to share your ideas in the comments below about how you have encouraged your students to become image detectives. What tools have you used? What have you witnessed for results in student learning?